
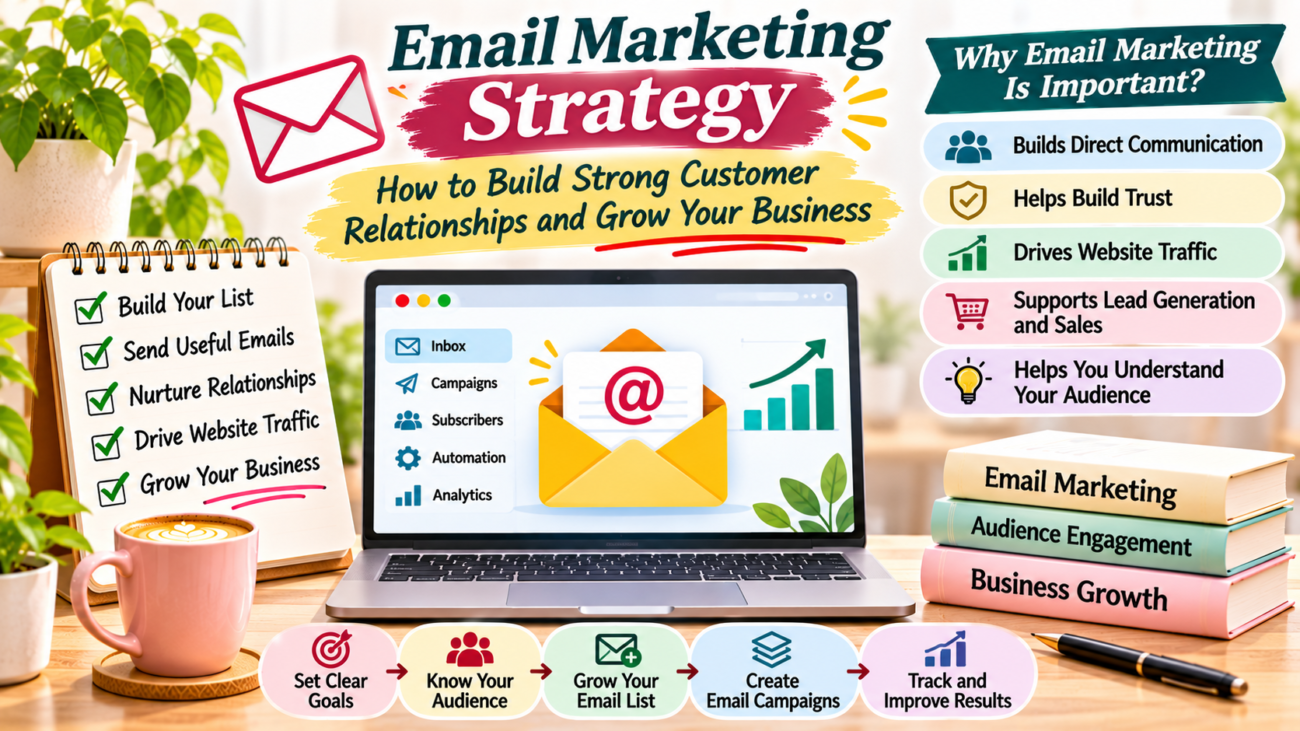
Email marketing strategy showing email campaigns, subscriber list building, audience engagement, automation and business growth.

Email Marketing Strategy: How to Build Strong Customer Relationships and Grow Your Business

An email list can become one of the most useful assets for your website or business. It gives you a direct way to communicate with people who are interested in your content, products, or services.

However, sending random emails is not enough. You need an email marketing strategy that helps you share useful information, build trust, and encourage subscribers to take action.

Whether you are a blogger, freelancer, content creator, or small business owner, email marketing can help you stay connected with your audience.

The good news is that you do not need a large budget or advanced technical skills to get started. With clear goals, helpful content, and a simple plan, you can build an effective email marketing system.

In this guide, you will learn how to create an email marketing strategy and use it to support your online growth.

What Is an Email Marketing Strategy?

An email marketing strategy is a planned approach to sending emails to an audience to achieve specific marketing goals.

It helps you decide:

  • Who should receive your emails.
  • What type of information you should share.
  • How frequently you should send messages.
  • Which email campaigns you should create.
  • What actions you want subscribers to take.
  • How you will measure email performance.

For example, a blogging website may send weekly newsletters with new articles, blogging tips, SEO guides, and useful resources.

A small business may use emails to introduce products, share updates, and communicate with customers.

Instead of sending messages without a purpose, a clear strategy makes every email more useful and relevant.

Why Is Email Marketing Important?

Email marketing can help you build lasting relationships with people who have already shown interest in your brand.

Here are some important benefits.

1. Builds Direct Communication With Your Audience

Social media platforms and search engines can help people discover your brand. However, email gives you another way to communicate directly with subscribers.

You can share updates, educational content, and useful resources without depending entirely on social media visibility.

2. Helps Build Trust

People are more likely to engage with a brand when they regularly receive useful and relevant information.

For example, a blogging website can send practical writing tips, SEO tutorials, and content planning advice.

Over time, these helpful messages can build familiarity and trust.

3. Drives Website Traffic

You can use newsletters to bring subscribers back to your website.

For example, when you publish a new article, include a short summary and a link in your email.

Interested readers can then visit your website to explore the complete guide.

4. Supports Lead Generation and Sales

Businesses can use email campaigns to introduce services, explain product benefits, and share relevant offers.

Similarly, freelancers can send professional updates to people who have requested information about their services.

The important thing is to provide useful information rather than sending constant promotional messages.

5. Helps You Understand Your Audience

Email engagement can provide useful information about subscriber interests.

For example, if many subscribers click links about SEO, you may want to create more content around that topic.

You can use these insights to improve your future campaigns.

How to Create an Effective Email Marketing Strategy

A successful email marketing plan starts with understanding your audience and setting clear goals.

Follow these practical steps.

Step 1: Define Your Email Marketing Goals

Before sending your first campaign, decide what you want to achieve.

Your goals may include:

  • Increasing website traffic.
  • Growing your email subscriber list.
  • Promoting new blog articles.
  • Generating business enquiries.
  • Building customer relationships.
  • Promoting products or services.
  • Encouraging repeat purchases.

Choose two or three main goals that match your business needs.

For example, a beginner-focused blog may prioritise newsletter subscriptions and website traffic.

A service-based business may focus on generating qualified enquiries.

Step 2: Understand Your Target Audience

Your emails should match the interests and needs of your subscribers.

Think about the people you want to reach.

Ask yourself:

  • What topics interest them?
  • What problems do they want to solve?
  • What information would help them?
  • How often would they like to hear from you?
  • What type of content do they prefer?

For example, subscribers to a digital marketing blog may be interested in blogging tips, keyword research, SEO, social media, and online freelancing.

Understanding these interests helps you create more relevant emails.

Step 3: Build an Email Subscriber List

Your email marketing strategy needs people who have chosen to receive your messages.

You can grow your list through different methods.

Website subscription forms: Add a simple form to relevant website pages.

Free resources: Offer a useful checklist, template, or beginner guide in exchange for an email subscription.

Blog content: Invite readers to subscribe after they read a helpful article.

Social media: Share your newsletter subscription page with interested followers.

Dedicated landing pages: Create a page that explains the benefits of joining your email list.

Always use clear consent practices. Tell people what they are signing up for and provide an easy way to unsubscribe.

Never purchase random email lists or add people without appropriate permission.

Step 4: Choose an Email Marketing Platform

An email marketing platform helps you collect subscribers, create campaigns, and manage email communication.

Some popular options include:

  • Mailchimp.
  • Brevo.
  • MailerLite.
  • Kit.

Compare their features, pricing, automation options, and subscriber limits before choosing one.

As a beginner, start with a platform that offers the features you actually need.

You do not need complicated automation systems when you are building your first email list.

Step 5: Create Useful Email Content

Your subscribers should receive information that makes joining your list worthwhile.

You can share different types of content, such as:

  • New blog articles.
  • Practical tips and tutorials.
  • Industry updates.
  • Free resources.
  • Product or service information.
  • Case studies.
  • Special announcements.

For example, a digital marketing newsletter may include one new blog post, three useful tips, and a recommended resource.

Keep your messages focused. One email does not need to cover every topic.

Step 6: Write Clear and Engaging Emails

A useful email should be easy to understand.

Follow these writing practices:

Write a clear subject line: Tell readers what the email contains.

Start with a friendly introduction: Explain why you are contacting them.

Keep the message focused: Share one main idea or a small group of related ideas.

Use short paragraphs: Make the email easy to read on mobile devices.

Add a clear call to action: Tell subscribers what to do next.

Include your business details: Make it clear who is sending the email.

Avoid misleading subject lines and excessive promotional language.

Step 7: Plan Your Email Sending Schedule

Consistency helps subscribers know what to expect.

However, sending too many emails can annoy people, while sending too few may make them forget your brand.

Choose a realistic schedule.

For example:

FrequencyEmail content
WeeklyNew articles and useful tips
Twice a monthEducational guides and resources
MonthlyImportant updates and content highlights
Campaign-basedRelevant product or service announcements

Start with a schedule you can maintain.

You can adjust the frequency based on subscriber preferences and campaign results.

Step 8: Use Email Segmentation

Email segmentation means dividing subscribers into smaller groups based on relevant information or interests.

For example, a digital marketing website may create groups for:

  • Blogging beginners.
  • SEO learners.
  • Freelancers.
  • Small business owners.
  • Social media marketers.

You can then send more relevant information to each group.

For example, readers interested in SEO may receive keyword research guides, while freelance writers may receive portfolio and client-finding tips.

Make sure your segmentation practices respect subscriber privacy and consent.

Step 9: Automate Important Emails

Email automation allows you to send certain messages automatically when a subscriber completes an action or meets a defined condition.

Useful beginner-friendly automations include:

Welcome email: Sent when someone joins your newsletter.

Resource delivery email: Sends a promised checklist or guide.

Onboarding sequence: Introduces your website and important resources.

Follow-up email: Shares related information after a subscriber interacts with a specific campaign.

Start with a simple welcome email. Add more workflows when you understand your audience and have a clear reason to use them.

Step 10: Measure and Improve Your Email Results

An email marketing strategy needs regular review.

Track important measurements such as:

  • Number of subscribers.
  • Email delivery rate.
  • Click rate.
  • Unsubscribe rate.
  • Website visits from email campaigns.
  • Leads or sales generated.

Open rates can provide some context, but privacy features may make them less reliable.

Focus on meaningful actions, such as link clicks and conversions.

Use your results to improve subject lines, email content, sending schedules, and calls to action.

Common Email Marketing Mistakes to Avoid

Even a good email campaign can become ineffective when basic practices are ignored.

1. Sending Emails Without Permission

Do not add people to your mailing list without appropriate consent.

Use clear subscription forms and explain what subscribers will receive.

2. Sending Too Many Promotional Emails

If every message tries to sell something, subscribers may lose interest.

Balance promotional messages with useful educational content.

3. Writing Confusing Subject Lines

Your subject line should clearly describe the email.

Avoid exaggerated promises or misleading wording.

4. Ignoring Mobile Users

Many people read emails on smartphones.

Use responsive email designs, readable fonts, and short paragraphs.

5. Forgetting to Include a Call to Action

If you want readers to visit an article or explore a service, provide a clear link or button.

6. Not Reviewing Campaign Results

Do not keep repeating the same email format without checking performance.

Review your reports and improve future campaigns.

Email Marketing Strategy Checklist

Use this checklist when planning your email marketing activities:

  • Set clear email marketing goals.
  • Understand your target audience.
  • Create a permission-based subscriber list.
  • Choose a suitable email marketing platform.
  • Plan useful email content.
  • Write clear subject lines.
  • Add relevant calls to action.
  • Choose a realistic sending schedule.
  • Segment subscribers when useful.
  • Set up a welcome email.
  • Track clicks and conversions.
  • Review and improve your campaigns.

A strong email marketing strategy helps you communicate with your audience, build trust, and support long-term business growth.

Start by defining your goals, understanding your subscribers, and sharing useful information consistently.

You do not need a complicated system to begin. A simple newsletter, a helpful welcome email, and a realistic publishing schedule can provide a strong foundation.

As your audience grows, you can introduce segmentation, automation, and more detailed campaign tracking.

Remember, successful email marketing is not about sending more messages. It is about sending the right information to the right people at the right time.

Video marketing strategy for beginners showing video content types, content planning, publishing, promotion and brand growth.

Video Marketing Strategy for Beginners: How to Grow Your Brand Online

Video has become an important part of online communication. People watch videos to learn new skills, discover products, understand services, and find solutions to everyday problems.

However, creating videos without a clear plan may not deliver the results you expect. You need a video marketing strategy that connects your content with your audience and business goals.

A good video marketing strategy helps you decide what videos to create, where to publish them, how to reach viewers, and how to measure performance.

The best part is that you do not need expensive equipment or professional editing skills to begin. You can start with simple videos, useful ideas, and a consistent publishing plan.

In this guide, you will learn how to build a video marketing strategy and use video content to grow your brand online.

What Is a Video Marketing Strategy?

A video marketing strategy is a plan for creating, publishing, promoting, and measuring videos to achieve specific marketing goals.

It helps you decide:

  • Who you want to reach.
  • What topics your videos should cover.
  • Which video formats are suitable for your audience.
  • Where you should publish your videos.
  • How often you should upload new content.
  • How you will measure your results.

For example, a digital marketing website can create videos about SEO basics, blogging tips, content creation, and social media marketing.

These videos can educate viewers and introduce them to the website’s articles and resources.

Instead of uploading random videos, a clear strategy gives every video a purpose.

Why Is Video Marketing Important?

Video content offers several ways to connect with an online audience.

Here are some important benefits.

1. Makes Information Easier to Understand

Some topics are easier to explain through demonstrations than long written explanations.

For example, a video showing how to set up a WordPress website can help beginners understand each step.

Similarly, a short tutorial can explain a simple SEO technique more clearly than a list of instructions.

2. Helps Build Brand Awareness

Regularly publishing useful videos can help people recognise your brand.

When viewers find your content helpful, they may remember your website, social media account, or business.

Over time, this can support stronger brand visibility.

3. Creates Opportunities for Audience Engagement

Videos give viewers different ways to interact with your content.

They can leave comments, ask questions, share videos, and subscribe to your channel.

These interactions can also help you understand which topics interest your audience.

4. Supports Website Traffic

You can use videos to introduce topics and direct interested viewers to relevant website articles.

For example, a video about keyword research can include a link to a detailed keyword research guide.

This gives viewers another way to explore your content.

5. Supports Different Marketing Goals

Video content can support several goals, including:

  • Increasing brand awareness.
  • Educating potential customers.
  • Generating website visits.
  • Building an online community.
  • Promoting products or services.
  • Supporting customer enquiries.

The results depend on your audience, content quality, distribution, and overall marketing plan.

Different Types of Video Marketing Content

Before creating videos, understand the formats you can use.

You do not need to create every type. Choose formats that match your topic, audience, and available resources.

1. Educational Videos

Educational videos explain a topic, answer a question, or teach a useful skill.

Examples include:

  • SEO tutorials for beginners.
  • Content writing tips.
  • Website setup guides.
  • Digital marketing lessons.
  • Online freelancing advice.

These videos are useful for websites and brands that want to share knowledge.

2. How-To and Tutorial Videos

Tutorial videos show viewers how to complete a particular task.

For example, you can create a step-by-step video explaining how to create a blog post, use an analytics tool, or design a social media graphic.

Keep the instructions clear and demonstrate the important steps.

3. Short-Form Videos

Short-form videos deliver information in a brief and engaging format.

You can use them to share:

  • Quick tips.
  • Simple tutorials.
  • Common mistakes.
  • Interesting facts.
  • Short product demonstrations.
  • Key points from longer articles.

You can publish suitable short videos on platforms such as YouTube Shorts and Instagram Reels.

4. Product and Service Videos

Businesses can use videos to explain their products or services.

These videos may show product features, demonstrate how something works, or explain how a service solves a customer problem.

Focus on clear and accurate information rather than exaggerated claims.

5. Behind-the-Scenes Videos

Behind-the-scenes videos show the people, process, or activities behind a brand.

For example, a creator may show how they prepare a blog post, organise a workspace, or create a new design.

This type of content can make a brand feel more approachable.

How to Create a Video Marketing Strategy Step by Step

Now that you understand the basics, follow these steps to create a practical strategy.

Step 1: Define Your Video Marketing Goals

Start by deciding what you want your videos to achieve.

Your goals should support your overall website or business objectives.

For example, you may want to:

  • Increase YouTube subscribers.
  • Improve brand awareness.
  • Bring more visitors to your website.
  • Generate product enquiries.
  • Educate your target audience.
  • Build an online community.

Choose two or three main goals at the beginning.

Also, decide how you will measure progress. For example, if your goal is website traffic, track visits that come from your video content.

Step 2: Understand Your Target Audience

Your videos should answer questions that matter to your audience.

Think about the people you want to reach.

Ask yourself:

  • What topics interest them?
  • What problems do they want to solve?
  • Which platforms do they use?
  • Do they prefer short videos or detailed tutorials?
  • What level of knowledge do they have?

For example, a beginner-focused digital marketing website may attract students, freelancers, bloggers, and small business owners.

These viewers may be interested in practical videos about SEO, blogging, website growth, and online income.

Understanding your audience helps you choose relevant video topics.

Step 3: Research Video Topics and Keywords

Before recording a video, research what people want to learn.

You can find ideas through:

  • YouTube search suggestions.
  • Google search suggestions.
  • Comments on related videos.
  • Questions in online communities.
  • Google Trends.
  • Questions from your website visitors.

Choose topics that match your audience’s interests.

For example, if your audience wants to learn SEO, possible video topics include:

  • What Is SEO?
  • How to Find Keywords for a Blog.
  • How to Improve Website Rankings.
  • Common SEO Mistakes Beginners Make.

Use relevant keywords naturally in your video title, description, and spoken content where appropriate.

Avoid choosing topics only because they appear popular. Make sure you can provide useful information.

Step 4: Choose the Right Video Platforms

You do not need to publish videos everywhere.

Choose platforms based on your audience and content style.

YouTube: Suitable for tutorials, educational videos, product demonstrations, and detailed guides.

Instagram: Useful for short videos, visual tips, creative content, and audience interaction.

Facebook: Can help you share videos with communities and followers.

LinkedIn: Suitable for professional knowledge, industry insights, business education, and career-related videos.

Your website: Embedding relevant videos in blog posts can give visitors another way to understand a topic.

Start with one main platform and one supporting platform. This makes your content easier to manage.

Step 5: Plan Your Video Content

A content calendar helps you organise video topics and publishing dates.

You can create a simple monthly plan using Google Sheets or Excel.

For example:

WeekVideo topicFormatGoal
Week 1What Is SEO?Educational videoAwareness
Week 2Three Keyword Research TipsShort videoEngagement
Week 3How to Write a Blog PostTutorialEducation
Week 4Common Blogging MistakesShort videoReach

Choose a schedule that fits your available time.

Publishing one useful video every week is a reasonable starting point if you are managing everything yourself.

Step 6: Create Useful and Engaging Videos

Your videos should provide value from the beginning.

Follow these practical tips:

  • Start with a clear introduction.
  • Explain what viewers will learn.
  • Keep the message focused.
  • Use simple language.
  • Add examples where helpful.
  • Maintain clear audio.
  • Use readable text when adding captions.
  • End with a relevant next step.

You do not need an expensive camera to create useful content. A smartphone, good lighting, and clear sound can be enough to get started.

Most importantly, make sure your video delivers what its title promises.

Step 7: Optimise Your Videos for Discovery

Creating a good video is only part of the process. You also need to make it easier for people to discover.

For YouTube, focus on these elements:

Video title: Write a clear title that explains what viewers will learn.

Description: Summarise the video and include relevant information or resource links.

Thumbnail: Use a clear and attractive image that represents the topic accurately.

Keywords: Include relevant search terms naturally in the title and description.

Captions: Add accurate captions to support viewers who prefer reading or cannot use audio.

Playlists: Organise related videos into playlists to make your channel easier to explore.

Optimisation can improve discoverability, but it does not guarantee views or rankings.

Step 8: Promote Your Videos

Do not depend on one platform to bring all your viewers.

Promote useful videos through relevant channels.

For example:

  • Share your video on social media.
  • Embed it in a related blog post.
  • Include it in your email newsletter.
  • Share useful video excerpts as short posts.
  • Participate in relevant online communities.
  • Link to it from related website resources.

You can also turn one long video into several short clips, provided each clip delivers a complete and useful idea.

For more ideas, read your guide on [content distribution strategy](https://meh fuzasultana.com/content-distribution-strategy/).

Step 9: Measure Video Marketing Performance

Tracking results helps you understand which videos are useful and where you need to improve.

Some important metrics include:

MetricWhat it tells you
ViewsHow many times people watched a video
Watch timeTotal time viewers spent watching
Average view durationAverage time spent watching each view
Audience retentionHow much of a video viewers watched
SubscribersHow many people subscribed to your channel
EngagementLikes, comments, and shares
Link clicksHow many viewers visited a linked page
ConversionsDesired actions completed after viewing

YouTube Studio provides analytics about your channel and individual videos.

For website visits and conversions, you can also use Google Analytics 4 with suitable tracking.

Review your results regularly. Use the information to improve future video topics, introductions, thumbnails, and calls to action.

Common Video Marketing Mistakes to Avoid

Beginners often make a few mistakes when starting video marketing.

1. Creating Videos Without a Clear Goal

Before recording, decide what the video should achieve. This keeps your content focused and useful.

2. Ignoring the Audience

Do not create videos only because a topic is trending. Focus on subjects that your viewers actually need.

3. Spending Too Much Time on Equipment

Expensive equipment is not essential when you are starting out. Prioritise clear sound, good lighting, and useful information.

4. Making Videos Too Complicated

Too many effects, long introductions, and unnecessary information can distract viewers.

Keep your message simple and organised.

5. Ignoring Video Titles and Thumbnails

A useful video still needs a clear title and an accurate thumbnail. These elements help viewers understand what the video offers.

6. Not Reviewing Analytics

If you never check performance, you may miss opportunities to improve.

Review your results and learn from videos that perform well or poorly.

A Simple Video Marketing Checklist

Use this checklist before publishing your next video:

  • Define the video’s main goal.
  • Identify the target audience.
  • Research the topic and relevant keywords.
  • Write a simple video outline.
  • Record clear audio and visuals.
  • Create an accurate title and thumbnail.
  • Add a useful description and captions.
  • Include a relevant call to action.
  • Publish on suitable platforms.
  • Promote the video through relevant channels.
  • Review analytics and improve future content.

A successful video marketing strategy does not depend on expensive equipment or uploading videos every day.

It starts with understanding your audience, choosing useful topics, selecting the right platforms, and creating content that solves real problems.

Begin with a simple publishing schedule and focus on improving one video at a time.

As you learn from audience feedback and performance data, you can make your videos more useful and reach more people.

Remember, the purpose of video marketing is not simply to get views. It is to build relationships, share valuable information, and support your long-term online growth.

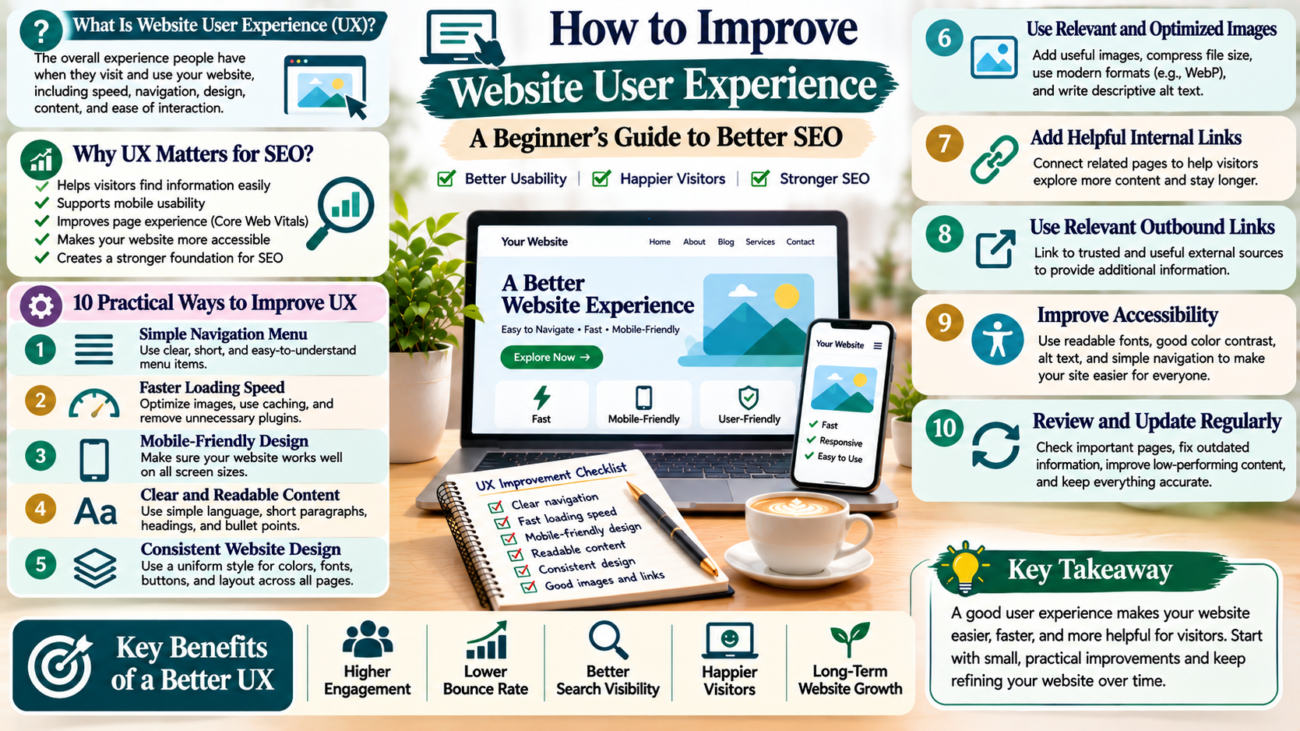
How to improve website user experience for better SEO, featuring simple navigation, faster loading speed, mobile-friendly design, readable content, consistent website design, optimized images, internal linking, accessibility, and regular website updates.

How to Improve Website User Experience: A Beginner’s Guide to Better SEO

A website should do more than look attractive. It should help visitors find information, understand your content, and complete their goals without difficulty.

Imagine visiting a website that takes too long to load, has confusing menus, and displays text that is difficult to read on a mobile phone. You may leave without exploring another page.

This is why website user experience matters. A good experience helps visitors navigate your website, find useful information, and interact with your content.

It also supports your SEO efforts. Search engines aim to provide useful results, so creating helpful and accessible pages is an important part of building a successful website.

In this guide, you will learn how to improve website user experience through simple design, navigation, content, speed, and accessibility improvements.

What Is Website User Experience?

Website user experience, also called UX, refers to how people feel when they visit and use your website.

It includes every part of their interaction, such as:

  • How quickly pages load.
  • How easily visitors find information.
  • Whether the website works on mobile devices.
  • How clearly content is presented.
  • Whether buttons and links work properly.
  • How easily visitors complete an action.

For example, a well-designed blog should make it easy for readers to open an article, read its sections, find related posts, and return to the main website.

Good user experience means making these activities simple and comfortable.

Why Is Website User Experience Important for SEO?

Website user experience and SEO are closely connected, although they are not the same thing.

SEO helps people discover your website through search engines. User experience helps them use your website after they arrive.

Here are some reasons why UX deserves attention.

1. Helps Visitors Find Information

Clear navigation, useful headings, and organised content help visitors find what they need.

When information is easy to access, people can explore your website more comfortably.

2. Supports Mobile Usability

Many people browse websites using smartphones. A website that works well on smaller screens makes reading and navigation easier.

3. Improves Page Experience

Page speed, mobile usability, and visual stability all affect how comfortable a website feels to use.

Google also considers Core Web Vitals as part of its page experience guidance.

4. Makes Your Website More Accessible

Accessible websites help more people understand and interact with your content.

For example, descriptive image text, readable fonts, and clear navigation can make a website easier to use.

5. Supports Your Overall SEO Strategy

Useful content, clear website structure, and a good technical experience create a stronger foundation for SEO.

However, improving UX does not guarantee higher Google rankings. Search visibility depends on several factors.

10 Practical Ways to Improve Website User Experience

You do not need to redesign your entire website to improve UX. Start with the areas that affect visitors most.

1. Create a Simple Website Navigation Menu

Your navigation menu should help visitors understand where to go.

Avoid adding too many menu items. Instead, organise important pages into clear categories.

For example, a digital marketing website may include:

  • Home
  • About
  • Blogging
  • SEO
  • Digital Marketing
  • Online Income
  • Contact

Use simple labels that visitors can understand.

Also, make sure the navigation menu works properly on mobile devices.

2. Improve Website Loading Speed

Visitors may become frustrated when a website takes too long to load.

A faster website makes browsing more comfortable, especially on mobile connections.

You can improve loading speed by:

  • Compressing large images.
  • Using suitable image formats such as WebP.
  • Choosing reliable hosting.
  • Removing unnecessary plugins.
  • Enabling browser caching.
  • Reducing unnecessary scripts.
  • Using a content delivery network when appropriate.

Test your website with Google PageSpeed Insights to identify possible performance problems.

3. Make Your Website Mobile-Friendly

Your website should work well on different screen sizes.

Check whether:

  • Text is easy to read.
  • Images fit the screen.
  • Buttons are easy to tap.
  • Menus open correctly.
  • Content does not overflow horizontally.
  • Forms work properly.

If you use WordPress and Elementor, preview your pages in desktop, tablet, and mobile views before publishing.

4. Use Clear and Readable Content

Visitors should not struggle to understand your website content.

Use simple language and organise information into short sections.

Follow these writing practices:

  • Keep paragraphs short.
  • Use descriptive headings.
  • Explain technical terms.
  • Add examples where useful.
  • Use bullet points for lists.
  • Highlight important information naturally.

For blog articles, a clear structure helps readers find the sections they need.

5. Use a Consistent Website Design

A consistent design makes your website feel organised and professional.

Choose a small set of colours, fonts, button styles, and spacing rules.

Use the same design approach across important pages.

For example, your headings, navigation menu, and buttons should look consistent throughout the website.

Avoid using too many colours or decorative elements. They can distract visitors from your content.

6. Add Clear Calls to Action

A call to action, or CTA, tells visitors what they can do next.

Examples include:

  • Read the Full Guide
  • Explore Our Services
  • Contact Us
  • Subscribe to Our Newsletter
  • View Related Articles

Use clear button labels that explain the action.

Place calls to action where they make sense. Avoid filling every section with promotional buttons.

7. Improve Your Internal Linking Structure

Internal links connect related pages on your website.

They help visitors discover additional information without returning to the main menu.

For example, a blog about SEO can link to related articles about keyword research, on-page SEO, and technical SEO.

Use meaningful anchor text so readers understand what they will find after clicking.

Internal links also help search engines discover and understand relationships between your pages.

8. Make Your Website Accessible

Website accessibility means making your website easier for people with different needs and abilities to use.

Start with these improvements:

  • Add descriptive alt text to meaningful images.
  • Use sufficient colour contrast.
  • Choose readable font sizes.
  • Make links easy to identify.
  • Provide labels for form fields.
  • Support keyboard navigation.
  • Use clear and descriptive headings.

For more guidance, explore the Web Content Accessibility Guidelines (WCAG).

9. Improve Forms and Contact Options

Forms should be simple and easy to complete.

Ask visitors only for the information you actually need.

For example, a basic contact form may include:

  • Name
  • Email address
  • Subject
  • Message

Use clear field labels and helpful error messages.

Also, check that your contact form works correctly on mobile devices.

10. Review Your Website Regularly

User experience can change as your website grows.

New plugins, design updates, and additional content may create problems.

Review your website regularly and check:

  • Broken links.
  • Missing images.
  • Slow-loading pages.
  • Confusing navigation.
  • Outdated information.
  • Mobile display problems.
  • Forms and buttons that do not work.

Use feedback and website analytics to identify areas that need attention.

How to Measure Website User Experience

You can use several tools to understand how visitors interact with your website.

Google PageSpeed Insights

This tool checks page performance on mobile and desktop devices.

It also reports Core Web Vitals and provides suggestions for improving performance.

Google Search Console

Search Console helps you monitor search performance and review Core Web Vitals reports where data is available.

You can also identify indexing problems and pages that need attention.

Google Analytics 4

Google Analytics 4 helps you understand website traffic and visitor interactions.

You can review reports to understand which pages people visit and how they interact with your website.

Manual Website Testing

Do not depend only on tools.

Visit your website as a normal visitor would. Open important pages, test menus, click buttons, complete forms, and read content on your phone.

This simple process can reveal problems that automated reports may not explain.

Common Website User Experience Mistakes to Avoid

Even a visually attractive website can create a poor experience when important details are ignored.

Avoid these common mistakes:

  1. Complicated navigation: Too many menu options can confuse visitors.
  2. Large uncompressed images: They may slow down page loading.
  3. Small mobile text: Visitors should not need to zoom in to read content.
  4. Too many pop-ups: Frequent interruptions can make browsing frustrating.
  5. Unclear buttons: Visitors should understand what happens when they click.
  6. Broken links: Check important links regularly.
  7. Inconsistent design: Different styles across pages can make a website feel disorganised.
  8. Ignoring accessibility: Make your content usable by a wider audience.

Improving website user experience is an ongoing process. It involves making your website easier to navigate, faster to load, simpler to read, and more comfortable to use.

Start with the basics. Improve your navigation, check mobile usability, optimise images, organise content, and make important actions clear.

You do not need to change everything at once. Review your most important pages first and make improvements step by step.

A website that puts visitors first creates a better experience and builds a stronger foundation for long-term SEO growth.

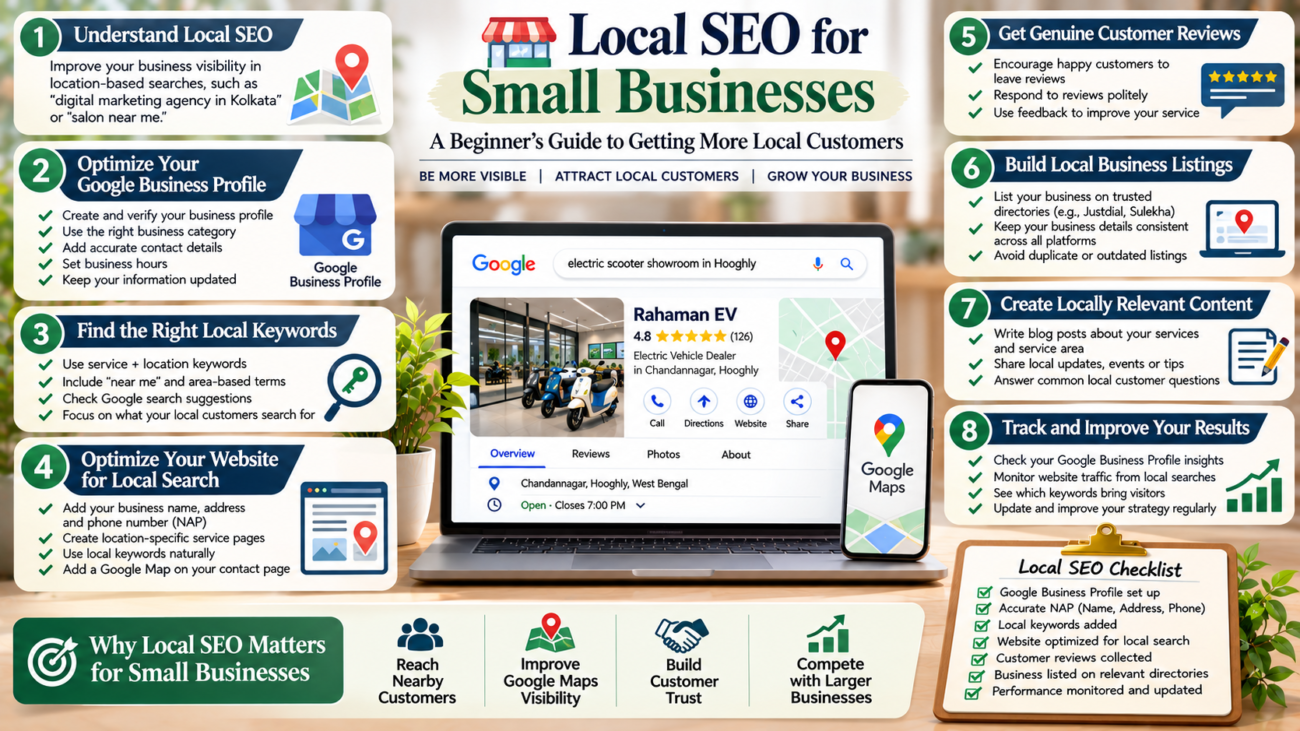
Local SEO for small businesses, showing Google Business Profile optimization, local keyword research, location-based website content, consistent business listings, genuine customer reviews, Google Maps visibility, and local search performance tracking.

Local SEO for Small Businesses: A Beginner’s Guide to Getting More Local Customers

When people need a nearby service, they often search on Google before making a decision. They may look for a restaurant, digital marketing agency, salon, repair shop, or other local business.

If your business does not appear in relevant local search results, potential customers may find your competitors instead.

This is where local SEO for small businesses becomes important. It helps your business become more visible when people search for products or services in a specific location.

The good news is that you do not need a large marketing budget to get started. You can improve your local online presence by optimizing your Google Business Profile, using location-based keywords, collecting genuine customer reviews, and building accurate business listings.

In this guide, you will learn how local SEO works and how to use simple strategies to attract more local customers.

What Is Local SEO for Small Businesses?

Local SEO for small businesses is the process of improving a business’s visibility in search results for location-based searches.

For example, imagine someone searches for:

  • Digital marketing agency in Kolkata.
  • Best bakery near me.
  • Electric scooter showroom in Hooghly.
  • Website designer in Chandannagar.

Google may show relevant local businesses, map results, and regular website listings.

Local SEO helps your business provide the information Google and potential customers need to understand your services and location.

It is useful for businesses such as:

  • Restaurants and cafes.
  • Retail shops.
  • Digital marketing agencies.
  • Salons and beauty services.
  • Electric vehicle dealerships.
  • Repair and maintenance services.
  • Freelancers serving a specific area.

Even a small business can build a stronger local presence with consistent effort.

Why Is Local SEO Important for Small Businesses?

Local SEO can help small businesses reach people who are already looking for nearby products or services.

Here are some important benefits.

1. Reach Nearby Customers

People often include a city, area, or neighbourhood in their searches.

For example, someone searching for a photography studio in Kolkata may be more interested in local options than businesses located in another state.

Local SEO helps your business appear for relevant searches in the areas you serve.

2. Improve Google Maps Visibility

Google Maps helps people discover nearby businesses, check locations, and find directions.

An accurate business profile can help potential customers understand where your business operates and how to contact you.

However, appearing in Maps is not guaranteed. Google considers factors such as relevance, distance, and prominence.

3. Build Trust With Customers

Customers often check business details and reviews before choosing a service.

A complete online presence with accurate contact information, genuine reviews, and useful photographs can help people make informed decisions.

4. Compete With Larger Businesses

Small businesses may not have the same advertising budgets as large companies.

However, they can focus on specific locations, services, and customer needs.

For example, a local web design agency can create useful content about website design services in its service area rather than trying to compete for every broad industry keyword.

1. Create and Optimize Your Google Business Profile

Your Google Business Profile is an important part of local SEO.

It allows eligible businesses to display information such as their name, address or service area, phone number, website, opening hours, and customer reviews.

Start by visiting Google Business Profile.

Follow these steps:

  1. Sign in with your Google account.
  2. Add your business name.
  3. Select the most accurate business category.
  4. Enter your business address or service area, as appropriate.
  5. Add your phone number and website.
  6. Set your business hours.
  7. Complete the verification process offered by Google.
  8. Review your profile regularly.

Choose the Right Business Category

Your primary category should describe the main service your business provides.

For example, a business that mainly provides website design services should choose a category that accurately represents that activity.

You can add relevant additional categories where appropriate. However, avoid selecting unrelated categories just to appear in more searches.

Add Accurate Business Information

Keep your business name, contact details, location, and opening hours accurate.

If your business changes its address or phone number, update the information promptly.

Do not add unnecessary keywords to your business name. Use your real business name as it appears in the real world.

2. Find the Right Local Keywords

Keywords help you understand what people search for when looking for nearby products or services.

For local SEO, focus on search terms that combine your service with a location or customer need.

For example:

Business typeExample local keyword
Digital agencyDigital marketing agency in Kolkata
BakeryBakery in Chandannagar
Electric vehicle showroomElectric scooter showroom in Hooghly
Web designerWebsite designer near me
SalonBeauty salon in Howrah

Think about the services you offer and the locations you genuinely serve.

You can also explore Google’s search suggestions and related searches to discover useful phrases.

Avoid targeting locations where your business does not operate. Your keywords should match your actual service area.

3. Create Location-Based Website Content

Your website should clearly explain what your business offers and where it operates.

Create useful pages for your main services. If you serve several areas, you can also create location pages when each page provides genuinely useful information.

For example, a digital marketing agency might create pages about:

  • SEO services in Kolkata.
  • Website design services in Hooghly.
  • Social media marketing for local businesses.

Each page should contain original information about the relevant service and location.

Include details such as:

  • Services available.
  • Areas served.
  • Business contact information.
  • Examples of relevant work.
  • Answers to common customer questions.

Do not create many nearly identical pages by changing only the city name. Such pages offer little value to visitors.

For more guidance on organizing website content, read our SEO for Beginners guide.

4. Keep Your Business Information Consistent

Your business information may appear on Google, social media, business directories, and other websites.

Important details include:

  • Business name.
  • Address.
  • Phone number.
  • Website URL.

Try to keep these details accurate and consistent wherever your business is listed.

For example, if your business has moved to a new address, update important online listings instead of leaving outdated information across the internet.

Consistency helps customers find the correct details. It also makes it easier for search engines to understand your business information.

5. Collect Genuine Customer Reviews

Customer reviews can influence how people evaluate local businesses.

A business with useful, genuine reviews may give potential customers more confidence when comparing local options.

Here are some practical ways to encourage reviews:

  1. Ask customers for honest feedback after a completed purchase or service.
  2. Share your official review link.
  3. Make the process simple.
  4. Respond politely to customer feedback.
  5. Address genuine complaints professionally.

Avoid buying reviews, creating fake accounts, or offering rewards in exchange for positive ratings.

When responding to a negative review, remain calm and helpful. If appropriate, invite the customer to discuss the issue through a suitable private channel.

Your goal should be to build trust, not simply collect a high review count.

6. Build Quality Local Business Listings

Local business listings are profiles that display information about your business on online directories and platforms.

Depending on your industry and location, relevant listings may include:

  • Local business directories.
  • Industry-specific directories.
  • Professional associations.
  • Local business organizations.
  • Relevant regional platforms.

When creating a listing, use accurate business details and a suitable business description.

Do not submit your website to hundreds of unrelated directories. Focus on reputable platforms that people in your area may actually use.

For every listing, check that the business name, contact details, address, and website are correct.

7. Make Your Website Mobile-Friendly

Many people search for local services using smartphones.

They may be standing outside a shop, travelling through a neighbourhood, or looking for a nearby service.

Therefore, your website should work well on smaller screens.

Check that:

  • Text is easy to read.
  • Menus are simple to use.
  • Contact buttons are easy to find.
  • Phone numbers are clickable.
  • Maps display correctly.
  • Images fit the screen.
  • Pages load without unnecessary delays.

Also, make sure your business address and contact details are easy to find.

For more website design tips, explore our guide on blog website design for beginners.

8. Use Local Business Schema Markup

Structured data helps search engines understand information about your website.

For eligible businesses, LocalBusiness structured data can describe details such as business name, address, phone number, and opening hours.

You can learn more through Google’s Local Business structured data documentation.

However, adding structured data does not guarantee special search appearances or higher rankings.

Make sure the information in your structured data matches the visible information on your website.

If you are unfamiliar with technical SEO, use a trusted WordPress SEO tool or ask a developer to help implement it correctly.

9. Track Your Local SEO Performance

Local SEO takes time, so review your progress regularly.

You can use several free tools to understand how people find and use your website.

Google Search Console

Google Search Console helps you review search queries, impressions, clicks, and indexing information.

Look for queries that include your service and location.

For example, you may discover that people find your website through searches related to website design in your city.

Google Analytics

Google Analytics helps you understand website visitors and their interactions.

You can review:

  • Website traffic.
  • Traffic sources.
  • Popular pages.
  • User engagement.
  • Important actions and conversions.

Google Business Profile Performance

Eligible businesses can also review performance information available in their Business Profile.

Depending on the report, this may include searches, profile views, calls, website clicks, and other customer interactions.

Review these results to understand which services and customer actions matter most to your business.

Common Local SEO Mistakes to Avoid

Small businesses often make simple mistakes that can weaken their local presence.

Using incorrect business information: Keep your contact details and address accurate.

Choosing unrelated business categories: Select categories that describe your real services.

Stuffing keywords into business names: Use your genuine business name.

Creating duplicate listings: Review existing profiles before creating new ones.

Buying fake reviews: Focus on genuine customer feedback.

Creating low-quality location pages: Each page should provide useful information.

Ignoring mobile users: Make sure visitors can easily contact your business from a smartphone.

Expecting instant results: Local SEO requires regular improvements and monitoring.

Local SEO for small businesses helps you reach people searching for nearby products and services. By improving your Google Business Profile, choosing relevant local keywords, creating useful website content, and collecting genuine customer reviews, you can build a stronger local online presence.

Start with the basics. Make sure your business information is accurate, your website works well on mobile devices, and your important service pages explain what you offer.

Next, review your search performance and update your strategy based on what customers are searching for.

You do not need to do everything at once. Consistent improvements can help your small business become easier to discover online.

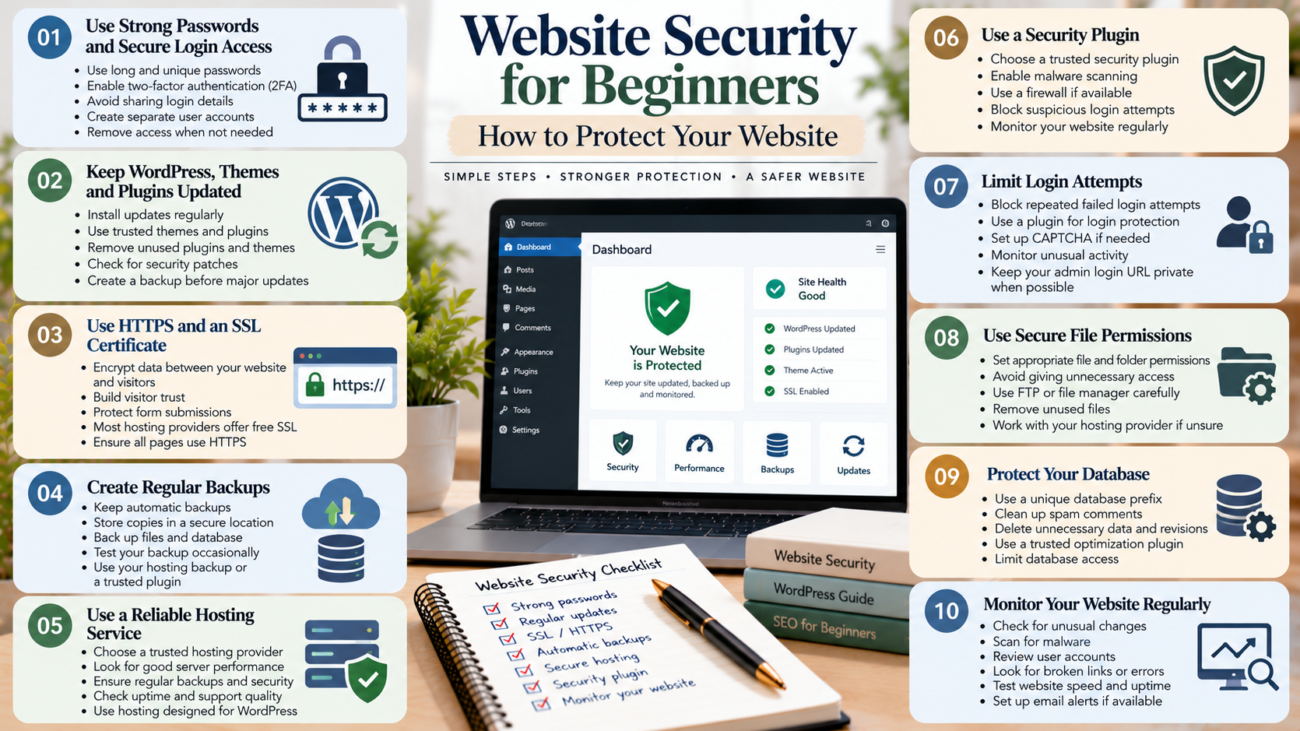
Website security for beginners, featuring strong passwords, WordPress updates, HTTPS protection, regular backups, secure hosting, security plugins, restricted login access, safe file permissions, database protection, and website monitoring.

Website Security for Beginners: How to Protect Your Website

Your website is an important part of your online presence. Whether you run a blog, a business website, or a freelance portfolio, you want visitors to browse safely and trust your content. However, websites can face security risks such as stolen passwords, malicious files, outdated software, and unauthorized access.

The good news is that website security for beginners does not have to be complicated. You can reduce many common risks by using strong passwords, keeping your website updated, creating regular backups, and choosing reliable hosting.

In this guide, you will learn the basics of website security, common threats to watch for, and practical steps you can take to protect your website.

What Is Website Security?

Website security refers to the steps you take to protect your website, its files, user information, and administrative access from unauthorized activity.

These steps help prevent attacks, reduce the risk of data loss, and keep your website available to visitors.

For example, a secure website should use appropriate access controls, keep its software updated, and protect information sent between the website and its visitors.

Website security is especially important if you use WordPress, collect contact form submissions, manage customer information, or publish content regularly.

However, no website is completely risk-free. The goal is to reduce avoidable risks and prepare for problems before they happen.

Why Is Website Security Important?

Website security supports both your website and your visitors.

1. Protect Your Website Data

Your website contains important information, including articles, images, settings, and user accounts. A security incident could damage or expose this information.

Regular backups and suitable access controls can help protect your work.

2. Build Visitor Trust

Visitors are more likely to feel comfortable when your website works correctly and handles their information responsibly.

For example, a website that uses HTTPS helps protect information exchanged between the visitor’s browser and the website.

3. Reduce Downtime

Malware, unauthorized changes, and other security problems can make a website unavailable.

Good security practices can reduce the likelihood of some incidents. They also help you recover more quickly if something goes wrong.

4. Support Your Website’s Long-Term Growth

A website may become more valuable as you publish articles, attract visitors, and build your brand.

Protecting that investment should be part of your regular website maintenance routine, alongside SEO for beginners and website performance improvements.

Common Website Security Threats

Before protecting your website, it helps to understand some common risks.

Weak Passwords

Simple passwords are easier to guess. Reusing the same password across several services can also put multiple accounts at risk if one account is compromised.

Outdated Software

Old versions of WordPress, themes, plugins, and server software may contain known security weaknesses.

Updates often include security fixes, so delaying them can leave your website exposed.

Malware

Malware is harmful software that may steal information, change website files, redirect visitors, or perform other unwanted actions.

It can enter a website through compromised accounts, vulnerable software, or unsafe files.

Unauthorized Login Attempts

Attackers may repeatedly try passwords or use stolen login details to access your website.

Strong passwords, multi-factor authentication, and suitable login protections can reduce this risk.

Missing Backups

If your website is damaged or compromised, a recent backup can help you restore important files and data.

Without a reliable backup, recovery may become more difficult.

1. Use Strong Passwords and Secure Login Access

One of the simplest ways to improve website security is to protect your login accounts.

Choose a long, unique password for your WordPress administrator account and hosting account. Avoid using your name, birthday, or other details that people could easily guess.

A password manager can help you create and store unique passwords.

You should also consider enabling multi-factor authentication (MFA). This adds another verification step when you sign in.

Follow these practices:

  • Use unique passwords for important accounts.
  • Enable MFA where available.
  • Avoid sharing administrator login details.
  • Create separate accounts for people who manage your website.
  • Remove access when someone no longer needs it.
  • Keep your recovery email account secure.

These steps help limit unauthorized access to your website.

2. Keep WordPress, Themes, and Plugins Updated

If you use WordPress, regular updates are an important part of website security for beginners.

Updates can fix known vulnerabilities, improve compatibility, and address software problems.

Check your WordPress dashboard regularly for available updates. Review updates for your theme and plugins as well.

Before making major changes, create a backup. If your website is important to your business, consider testing updates on a staging site first.

Also, remove themes and plugins that you no longer use. Unused software can create unnecessary maintenance work and may introduce additional risks if it becomes outdated.

Do not install plugins from unknown or untrusted sources. Choose software with a reliable development history and appropriate maintenance.

3. Use HTTPS and an SSL/TLS Certificate

HTTPS helps protect data exchanged between a visitor’s browser and your website.

This protection relies on TLS, which is commonly associated with SSL certificates. Although people often use the term SSL certificate, modern websites generally use TLS for secure connections.

A website using HTTPS displays a secure connection in the browser.

To set it up:

  1. Check whether your hosting provider offers an SSL/TLS certificate.
  2. Install or activate the certificate through your hosting service.
  3. Confirm that your website loads using HTTPS.
  4. Update website settings and links where necessary.
  5. Check for mixed-content warnings caused by resources still loading over HTTP.

Many hosting providers offer certificates at no additional cost.

Remember that HTTPS protects data in transit, but it does not automatically protect your website from malware, weak passwords, or other security problems.

4. Choose Reliable Website Hosting

Your hosting provider plays an important role in website security.

A reliable provider may offer server maintenance, security monitoring, malware detection, backups, and technical support. The exact features depend on the hosting plan.

When comparing hosting services, look for:

  • Regular server maintenance.
  • Clear backup and recovery options.
  • Security monitoring or related tools.
  • Timely software updates.
  • Reliable technical support.
  • Protection against common network attacks.

Ask your provider which security features are included. This can help you avoid paying for tools that your hosting plan already provides.

If your website handles sensitive customer information, review your security requirements carefully and seek professional advice when necessary.

5. Create Regular Website Backups

Backups are copies of your website files and database that you can use to restore your website after a problem.

They are useful if an update breaks your site, important content disappears, or a security incident damages your files.

A suitable backup plan should include:

  • Website files, including themes and uploads.
  • Your WordPress database.
  • A regular backup schedule.
  • Copies stored separately from the live website.
  • A way to restore the backup.
  • Periodic restoration tests.

How often you back up your website depends on how frequently it changes. A blog that publishes every day may need more frequent backups than a static portfolio.

Do not assume a backup works simply because a tool says it completed successfully. Test the restoration process periodically.

6. Install a Suitable Security Plugin

A WordPress security plugin can help with tasks such as monitoring suspicious activity, scanning for malware, or applying certain login protections.

However, a plugin is only one part of your security setup.

Before installing one, check its features, maintenance history, compatibility, and resource requirements.

Avoid installing several security plugins that perform the same functions. They may conflict or make your setup harder to manage.

Also, review the security features already provided by your hosting service. You may not need a separate tool for every task.

7. Limit User Permissions

Not everyone who works on your website needs full administrator access.

WordPress provides different user roles with different permissions. Assign each person the lowest level of access needed to complete their work.

For example, someone who only writes blog posts may not need permission to install plugins or change website settings.

Review your user accounts regularly and remove accounts that are no longer required.

If you work with freelancers or agencies, avoid sharing one administrator account. Individual accounts make it easier to manage access and identify activity.

8. Protect Contact Forms and Visitor Information

If your website includes contact forms, newsletter signups, or customer inquiries, think carefully about how you collect and store personal information.

Collect only the information you need. Restrict access to submissions and keep your form plugins updated.

You should also:

  • Use HTTPS.
  • Choose reputable form tools.
  • Apply suitable spam protection.
  • Avoid exposing private information in public pages.
  • Publish a clear privacy policy when appropriate.
  • Follow the privacy rules that apply to your audience and business.

Security and privacy are related, but they are not the same. A secure connection does not automatically make every data collection practice appropriate.

9. Monitor Your Website for Problems

Regular monitoring can help you notice unusual activity before a small issue becomes a larger problem.

Check your website for unexpected changes, unfamiliar administrator accounts, suspicious redirects, and security warnings.

You can also review security alerts from your hosting provider or security tools.

If your website suddenly displays unfamiliar content or redirects visitors to unrelated pages, investigate promptly.

If you suspect a compromise, contact your hosting provider or a qualified security professional. Avoid making random changes that could destroy useful evidence or complicate recovery.

10. Create a Simple Website Security Routine

You do not need to check every setting every day. A regular maintenance routine can make website security easier to manage.

Weekly:

  • Review important security alerts.
  • Check that your website works correctly.
  • Confirm that expected backups are running.

Monthly:

  • Review WordPress, theme, and plugin updates.
  • Remove unused software and unnecessary accounts.
  • Check your website’s security settings.

Periodically:

  • Test backup restoration.
  • Review hosting security features.
  • Check account permissions.
  • Review your recovery plan.

Adjust this routine based on your website’s size, activity, and risk level.

Common Website Security Mistakes to Avoid

Avoid these common mistakes when protecting your website.

Using weak passwords: Choose unique passwords and enable MFA where possible.

Ignoring updates: Review and apply appropriate security updates promptly.

Relying only on a security plugin: Use multiple layers of protection instead of depending on one tool.

Skipping backups: Maintain separate backups and test restoration.

Giving everyone administrator access: Assign permissions according to each person’s responsibilities.

Ignoring security warnings: Investigate unexpected changes or alerts rather than dismissing them.

Assuming HTTPS makes everything safe: HTTPS protects data in transit but does not remove every website security risk.

Conclusion

Website security for beginners starts with a few practical habits. Use strong passwords, enable multi-factor authentication, keep your software updated, use HTTPS, and create regular backups.

If you use WordPress, review your plugins, user permissions, hosting features, and security settings regularly. Also, prepare a recovery plan so you know what to do if your website experiences a problem.

You do not need to implement every advanced security measure at once. Start with the basics, check your setup regularly, and improve your protection as your website grows.

A secure website helps protect your work, supports visitor trust, and gives you a stronger foundation for long-term growth.

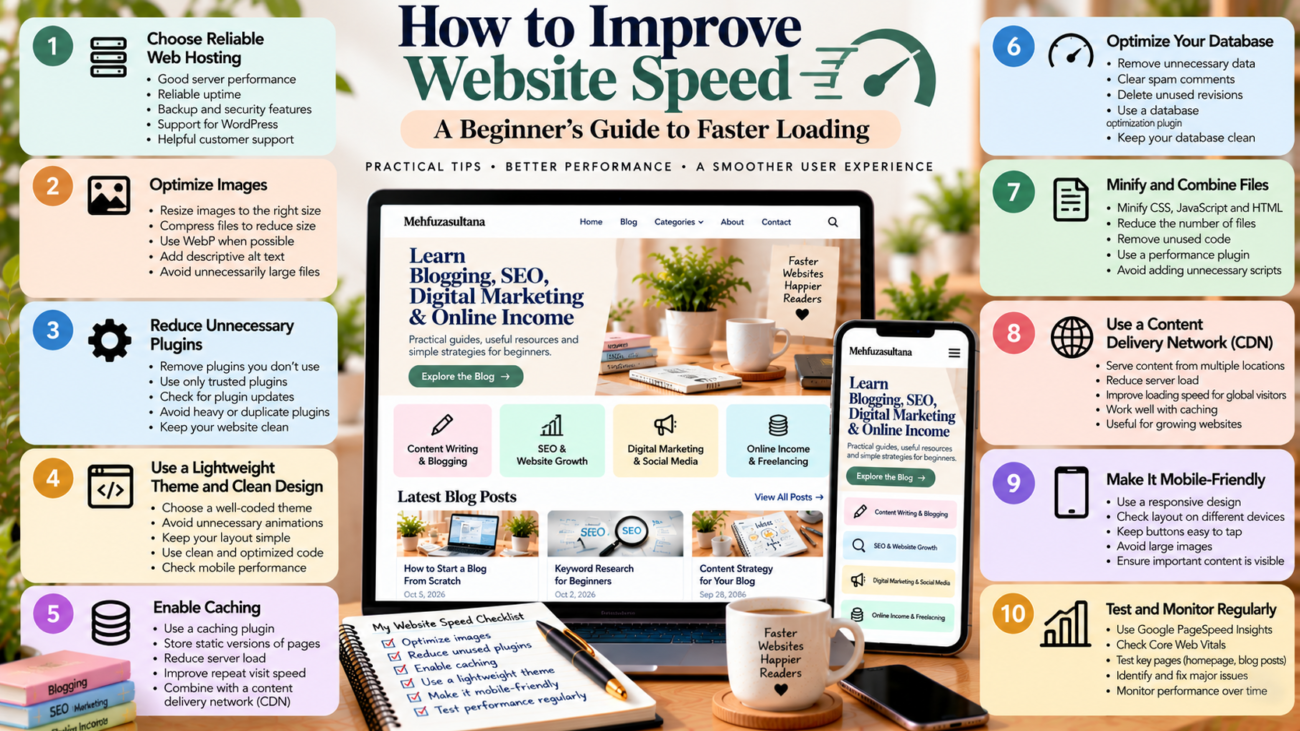
How to improve website speed with image optimization, reliable hosting, fewer plugins, caching, a lightweight WordPress theme, mobile-friendly design, and regular performance testing.

How to Improve Website Speed: A Beginner’s Guide to Faster Loading

Website speed plays an important role in the success of your website. When a page loads quickly, visitors can find information without unnecessary delays. However, a slow website can frustrate readers and make it harder for them to explore your content.

Imagine someone clicks your blog post after finding it on Google. If the page takes too long to load, the visitor may leave before reading a single paragraph. As a result, you could lose an opportunity to engage a reader or gain a potential customer.

The good news is that you do not need advanced coding skills to improve website speed. Simple steps, such as optimizing images, reducing unnecessary plugins, and choosing reliable hosting, can make a difference.

In this guide, you will learn what affects website speed, how to test your website, and which improvements you can make to create a faster experience for visitors.

What Is Website Speed?

Website speed refers to how quickly a website loads and becomes usable for visitors. It includes more than the time needed to display the first part of a page.

For example, a page may show its heading quickly but still take several seconds to display images or respond to clicks. Therefore, it is important to consider both loading time and the overall user experience.

Website performance can depend on several factors, including:

  • Your web hosting service.
  • Image and video file sizes.
  • WordPress themes and plugins.
  • Website code and scripts.
  • Browser caching.
  • Server response time.
  • The visitor’s device and internet connection.

Understanding these factors helps you identify the problems that may be slowing down your website.

Why Is Website Speed Important?

A fast website makes it easier for visitors to access information. It also supports a smoother browsing experience.

Here are some important reasons to improve your website performance.

1. Better User Experience

Visitors expect websites to respond quickly. When pages load without unnecessary delays, readers can move between articles and explore your website more comfortably.

On the other hand, slow pages can interrupt reading and make navigation frustrating.

2. Support for SEO

Google uses page experience signals and Core Web Vitals as part of its broader approach to evaluating user experience. However, speed alone does not guarantee higher rankings.

Useful content, search intent, website structure, and many other factors also matter. Therefore, combine performance improvements with a strong content and SEO strategy.

You can read the Google Search Central SEO Starter Guide to understand other important SEO practices.

3. Improved Mobile Experience

Many visitors access websites through smartphones. A page that loads slowly or shifts around while opening can create a poor mobile experience.

Optimizing images, reducing unnecessary scripts, and improving your page layout can help visitors browse more comfortably.

4. Better Business Opportunities

If you run a business website, an online store, or a freelance portfolio, performance can affect how easily visitors explore your services.

A smooth website experience helps people find information, review your work, and reach your contact page without unnecessary delays.

How to Test Your Website Speed

Before making changes, test your website. This gives you a starting point and helps you identify areas that need attention.

Use Google PageSpeed Insights

Google PageSpeed Insights is a free tool that analyzes web pages and provides performance recommendations.

Follow these steps:

  1. Open Google PageSpeed Insights.
  2. Enter your website or page URL.
  3. Select the mobile or desktop report.
  4. Run the analysis.
  5. Review the performance score and recommendations.
  6. Identify the issues that appear most important.

Test individual pages as well as your homepage. A homepage may load quickly while an article with several large images performs poorly.

Understand Core Web Vitals

Core Web Vitals measure important parts of the user experience. Three key metrics are particularly useful.

  • Largest Contentful Paint (LCP): Measures how quickly the main content becomes visible. A good result is 2.5 seconds or less.
  • Interaction to Next Paint (INP): Measures how responsive a page is to user interactions. A good result is 200 milliseconds or less.
  • Cumulative Layout Shift (CLS): Measures unexpected movement of page elements. A good result is 0.1 or less.

These thresholds help you understand whether a page provides a good experience according to Google’s guidance. Results can vary between laboratory tests and real-user data.

Do not focus only on achieving a perfect score. First, identify problems that affect loading, interaction, or visual stability.

1. Choose Reliable Web Hosting

Your hosting service stores your website files and delivers them to visitors. Therefore, hosting can affect how quickly your pages respond.

Very limited hosting resources may struggle when your website receives more visitors or runs resource-heavy plugins.

When choosing hosting, consider:

  • Server performance and reliability.
  • Support for your website platform.
  • Backup options.
  • Security features.
  • Customer support.
  • The resources included in your plan.

If your website regularly loads slowly, check your hosting performance before making expensive design changes.

However, do not upgrade your hosting automatically. First, test your website and check whether the problem comes from large images, plugins, or other factors.

2. Optimize Images for Faster Loading

Large image files are a common reason for slow blog pages. High-quality images are useful, but they do not need to be unnecessarily large.

Image optimization reduces file size while maintaining suitable visual quality.

Here is how to optimize images for your website:

  • Resize images to match their display dimensions.
  • Compress images before uploading them.
  • Use WebP or another suitable modern image format.
  • Avoid uploading several versions of the same image unnecessarily.
  • Add descriptive alt text for accessibility.
  • Use lazy loading for suitable images below the initial screen.

For example, if an image appears at a width of 800 pixels, uploading a much larger file may waste bandwidth unless a larger version is needed for responsive displays.

Also, avoid lazy-loading the main image that visitors see immediately when the page opens. Loading that image promptly can help improve the initial experience.

3. Remove Unnecessary WordPress Plugins

Plugins add useful features to WordPress. However, unnecessary or poorly optimized plugins can increase page requests, load additional scripts, or create conflicts.

Review your installed plugins regularly.

Ask yourself:

  • Do I still use this plugin?
  • Does another tool already provide the same feature?
  • Does the plugin load scripts on every page?
  • Is it maintained and compatible with my WordPress version?

Remove plugins you no longer need. Before making major changes, create a backup and test your website afterward.

Remember that the number of plugins alone does not determine website speed. One poorly optimized plugin may create more problems than several lightweight plugins.

4. Use Caching to Improve Loading Time

Caching stores certain website resources so the server does not need to generate or retrieve everything from scratch for every visit.

For example, page caching can serve a saved version of a page to visitors. Browser caching can allow returning visitors to reuse certain files already stored on their devices.

Depending on your hosting setup, you may be able to use:

  • Page caching.
  • Browser caching.
  • Server-level caching.
  • Object caching for suitable websites.

Many WordPress hosting providers offer built-in caching features. Some caching plugins also provide settings that help improve performance.

Before enabling caching, check your hosting provider’s recommendations. Avoid running several overlapping caching tools because they can cause conflicts or display outdated content.

After making changes, clear the relevant caches and test your website again.

5. Choose a Lightweight WordPress Theme

Your WordPress theme controls much of your website’s layout and appearance. A theme with excessive effects or unnecessary features may add extra resources.

A lightweight theme can help you build a cleaner website without loading features you never use.

When reviewing your theme, check whether it offers:

  • Responsive layouts.
  • Simple typography settings.
  • Efficient code.
  • Useful customization options.
  • Compatibility with your page builder.
  • Regular updates and support.

If you use Elementor, review the widgets and design elements on your pages. Remove unnecessary animations and complex sections that add little value.

You do not always need to change your theme to improve speed. First, optimize your existing design and test the results.

6. Reduce Unnecessary Scripts and Animations

Websites often use scripts for analytics, social sharing, chat widgets, advertisements, animations, and other features.

Although these tools can be useful, too many scripts may delay page rendering or affect responsiveness.

Review the third-party tools installed on your website. Remove features that do not support your goals.

For example, if you do not use a particular chat widget, removing it may reduce unnecessary loading. Similarly, replacing several animated elements with a simpler layout may improve the user experience.

If you use analytics tools, keep the tools that provide useful information. The goal is not to remove every script but to avoid loading resources without a clear purpose.

7. Use a Content Delivery Network When Needed

A content delivery network, or CDN, stores copies of suitable website resources across multiple servers. Visitors can then receive those resources from a server closer to their location.

A CDN can be useful when your audience is spread across different regions or your website serves many images and other static files.

However, not every small blog needs a CDN immediately. Your hosting, page design, and image sizes may have a greater impact on performance at the beginning.

Start with basic optimization. Consider a CDN if your testing shows that it could help your website and your hosting setup supports it.

8. Keep Your Website Updated

Outdated software can create security, compatibility, and performance problems.

Keep WordPress, your theme, and your plugins updated. Before major updates, make a backup and check that your important features continue to work.

You should also remove unused themes and plugins when appropriate.

Updates do not guarantee a faster website, but maintaining your website helps you avoid problems caused by outdated or incompatible software.

9. Monitor Website Speed After Making Changes

Website optimization is an ongoing process. A change that improves one page may not have the same effect on another page.

After making an improvement:

  1. Test the same URL again.
  2. Compare the new results with your earlier test.
  3. Check whether the intended problem improved.
  4. Open the page on a real mobile device.
  5. Make sure images, menus, and forms still work.

You can also review website traffic and visitor behavior using Google Analytics. Analytics can help you understand how visitors use your website, although it does not replace dedicated speed testing.

For more guidance, read Google Analytics for Beginners.

Common Website Speed Mistakes to Avoid

When trying to improve performance, avoid these common mistakes.

Chasing a perfect score: A score is useful, but your goal should be a fast and usable website.

Installing too many optimization plugins: Overlapping features can cause conflicts.

Uploading oversized images: Large files can increase loading time.

Ignoring mobile performance: A page may perform differently on mobile and desktop.

Making several changes at once: It becomes difficult to identify which change helped.

Forgetting backups: Always protect your website before major technical changes.

Ignoring content quality: Speed improvements do not replace useful, relevant, well-structured content.

Improving website speed is an important step towards creating a better experience for your readers. A faster website helps visitors access information, explore articles, and use your pages with fewer delays.

Start by testing your website with Google PageSpeed Insights. Then optimize images, review your hosting, remove unnecessary plugins, enable suitable caching, and simplify heavy design elements.

Make one change at a time and test the results. You do not need to apply every advanced technique immediately.

By combining regular performance checks with useful content and good website design, you can build a website that is easier to use and better prepared to grow

Blog website design for beginners, showing a clear website layout, helpful homepage, simple navigation, readable fonts, optimized images, mobile-friendly design, faster loading speed, and essential elements that build reader trust.

Blog Website Design for Beginners: How to Create a Website Readers Trust

A good blog is more than a collection of articles. It is a place where readers discover useful information, learn new skills, and find answers to their questions. However, even great content can struggle if a website looks confusing or feels difficult to use.

That is why blog website design matters. A clear layout helps visitors find information, read articles comfortably, and explore more pages. It can also help you build trust with your audience.

The good news is that you do not need advanced coding skills to create a professional blog. With the right layout, simple navigation, readable content, and a consistent visual style, you can build a website that serves your readers well.

In this beginner-friendly guide, you will learn how to design a blog, improve user experience, and make your website easier to navigate.

What Is Blog Website Design?

Blog website design is the process of planning how your blog looks, works, and presents information to visitors.

It includes the layout, colours, fonts, menus, images, buttons, and overall structure of your website. It also covers how easily readers can move between pages and find the content they need.

For example, a well-designed blog usually has a clear homepage, simple navigation, readable articles, and organised categories. Visitors can understand the website’s purpose without spending too much time searching.

Good design is not about adding as many visual effects as possible. Instead, it focuses on making your content easy to find and use.

Why Does Blog Design Matter?

Your website design shapes the first impression visitors have of your blog. When people arrive, they should quickly understand what your website offers and where they can find useful information.

Here are some important benefits of a well-designed blog.

1. It Builds Reader Trust

A clean and consistent website can make your blog feel more professional. Clear headings, working links, readable text, and useful information help visitors feel comfortable exploring your content.

On the other hand, broken links, crowded layouts, and confusing menus can make a website feel neglected.

2. It Improves the Reading Experience

Readers should focus on your content instead of struggling with the layout. Short paragraphs, clear headings, and enough spacing make articles easier to read.

This matters even more when visitors use smartphones or tablets.

3. It Helps Visitors Find More Content

A clear category structure and useful internal links help readers discover related articles. For example, someone reading about keyword research may also want to explore on-page SEO or content planning.

You can connect these articles through relevant links and well-organised categories.

4. It Supports Your SEO Efforts

Website design alone cannot guarantee high search rankings. However, a well-organised website can make pages easier for visitors to use and help search engines discover and understand your content.

Google recommends creating helpful, people-first content and making websites accessible to users and search engines.

Read the Google Search Central SEO Starter Guide to learn more about website structure and SEO basics.

1. Choose a Clear Blog Layout

Your layout determines how visitors see the main parts of your website.

For a beginner blog, keep the structure simple. You do not need a complicated homepage with many sections or decorative elements.

A useful blog layout can include:

  • A header with your logo and navigation menu.
  • A homepage introduction explaining your website.
  • Featured or recent blog posts.
  • Clear topic categories.
  • A main content area for articles.
  • An About page and Contact page.
  • A footer with useful links.

Think about your audience before choosing a layout. If your blog teaches SEO, blogging, digital marketing, and online income, organise these topics so readers can explore each subject easily.

Avoid displaying everything on the homepage. Highlight the most important information first and allow visitors to explore the rest through menus and category pages.

2. Design a Homepage That Explains Your Blog

Your homepage is often the first page visitors see. It should explain what your website offers and guide readers towards useful content.

Start with a clear headline that describes your blog’s purpose. Add a short introduction that explains who your content helps.

For example, a beginner-focused marketing blog could introduce its topics with a message about learning SEO, creating better content, and growing an online presence.

Next, include sections that guide visitors through your website:

  • Introduction: Explain what readers can learn.
  • Main categories: Highlight your core content topics.
  • Featured articles: Recommend useful starting points.
  • About section: Introduce your website or brand.
  • Call to action: Invite visitors to explore articles or subscribe to updates.

Keep the layout organised and avoid adding too many sections without a clear purpose.

For detailed steps, read how to design a homepage that guides visitors.

3. Make Website Navigation Simple

Website navigation helps visitors move between pages. If the menu is confusing, people may struggle to find your most useful content.

Use clear labels that describe what each page contains. For example, labels such as Blog, About, Services, and Contact are easier to understand than vague or creative alternatives.

If your website has several content categories, group related topics together. You can also use breadcrumbs where appropriate to help visitors understand where they are within your website.

Keep these navigation tips in mind:

  • Limit the number of main menu items.
  • Use clear and familiar labels.
  • Make menus work on mobile devices.
  • Link to important pages.
  • Check that every menu link works.
  • Avoid unnecessary menu levels.

Your navigation should help readers reach important information without making them think too hard.

Read website navigation tips for bloggers for more guidance.

4. Choose Readable Fonts and Colours

Your blog’s visual style should support the content, not compete with it.

Choose one clear font for body text and, if needed, another complementary font for headings. Too many font styles can make the website look inconsistent.

Use enough contrast between text and background. For example, dark text on a light background is often comfortable for long articles.

A simple colour palette might include:

  • One main brand colour.
  • One complementary accent colour.
  • A neutral background.
  • A readable text colour.

Keep the same visual style across your homepage, articles, buttons, and other pages. This helps create a consistent experience.

Also, make sure your font size and spacing remain comfortable on small screens. A beautiful desktop design is not useful if readers struggle to read the text on a phone.

5. Make Your Blog Mobile-Friendly

Many readers access websites through smartphones. Your blog should therefore adjust to different screen sizes.

A responsive website changes its layout to suit the device. Columns may stack vertically, menus may collapse, and images should fit the available space.

To improve the mobile experience:

  • Use a responsive WordPress theme.
  • Keep body text readable.
  • Make buttons easy to tap.
  • Avoid horizontal scrolling.
  • Reduce unnecessary pop-ups.
  • Check that forms work on mobile.
  • Test important pages on a real phone.

If you use Elementor, review its responsive controls for desktop, tablet, and mobile. Adjust spacing, font sizes, and column layouts where necessary.

You can follow this detailed guide on making your blog easier to read on mobile devices.

6. Organise Your Blog Posts and Categories

As your blog grows, organisation becomes increasingly important. Without a clear structure, readers may find it difficult to discover related content.

Create categories that match the main subjects covered by your website. For example, a digital marketing blog could use categories such as Content Writing, SEO, Social Media Marketing, and Online Income.

Each category should have a clear purpose. Avoid creating too many categories with only one or two unrelated posts.

You can also organise related articles into content clusters. A main guide covers a broad topic, while supporting articles explain specific parts in more detail.

For example, a main SEO guide might link to separate articles about keyword research, technical SEO, and internal linking.

This approach gives readers a clearer learning path and helps you plan related content.

7. Use Internal Links to Connect Articles

Internal links connect one page of your website to another. They help readers discover relevant content without returning to the homepage or searching again.

They can also help search engines discover pages and understand how your content relates to other topics.

Add internal links when they genuinely help the reader.

For example, an article about writing blog posts could link to a guide about finding blog topics. A post about website traffic could link to your keyword research resources.

Follow these practices:

  • Link to relevant articles.
  • Use descriptive anchor text.
  • Place links naturally within the content.
  • Check that linked pages are available.
  • Avoid adding too many links to one paragraph.

A useful internal linking strategy supports both navigation and content discovery. However, every link should have a clear purpose.

8. Improve Website Speed and Performance

Visitors expect pages to load without unnecessary delays. A slow website can make it harder for readers to access your content.

Start by reviewing your images. Large image files can increase loading time, so resize and compress them before uploading.

You can also improve performance by removing unnecessary plugins, reducing excessive animations, using suitable caching, and choosing reliable hosting.

Test your website with Google PageSpeed Insights to identify performance issues and possible improvements.

Do not focus only on the score. Review the recommendations and address the issues that matter most to your visitors.

A lightweight, organised website is often easier to maintain than one filled with unnecessary features.

9. Add Useful Calls to Action

A call to action tells visitors what they can do next. It should be relevant to the page and easy to understand.

For a blog, useful calls to action might include:

  • Read the next article.
  • Explore a topic category.
  • Subscribe to your newsletter.
  • View your services.
  • Contact you for more information.

Place calls to action where they make sense. For example, you might recommend a related article at the end of a tutorial.

Avoid overwhelming readers with several competing buttons. Choose one main action for each section and make its purpose clear.

10. Build Trust With Essential Pages

A professional blog should help visitors understand who runs the website and how to get in touch.

Consider adding these pages:

About page: Explain your website’s purpose, your experience, and the type of content readers can expect.

Contact page: Provide a simple way for visitors, clients, or collaborators to contact you.

Privacy policy: Explain relevant information about data collection and privacy practices.

Disclosure page: If you publish affiliate links or sponsored content, provide appropriate disclosures.

Keep these pages accurate and update them when your website changes. Do not add claims about qualifications, results, or services that you cannot support.

11. Common Blog Design Mistakes to Avoid

Even a good website can become difficult to use when design choices distract from the content.

Avoid these common mistakes:

  • Using too many colours and fonts.
  • Adding unnecessary animations.
  • Creating complicated navigation menus.
  • Publishing articles with long, unbroken paragraphs.
  • Uploading oversized images.
  • Ignoring mobile layouts.
  • Leaving broken links on important pages.
  • Adding pop-ups that cover the main content.
  • Using inconsistent headings and spacing.

Review your website regularly. Ask someone unfamiliar with your blog to find a specific article or contact page. Their experience may reveal problems you have overlooked.

12. How to Improve Your Blog Design Over Time

You do not need to redesign your entire website at once. Instead, make small improvements based on visitor needs.

Start with your homepage and most popular articles. Check whether readers can understand the content, find related pages, and use the website on mobile devices.

Then review your website analytics, search performance, and visitor feedback where available.

Look for pages that attract visitors but provide a confusing experience. Improve the layout, strengthen relevant internal links, and remove unnecessary distractions.

After making changes, test the pages again. Keep what works and continue improving areas that create problems.

Good blog website design makes it easier for readers to find information, understand your content, and explore your website. You do not need expensive tools or advanced coding skills to create a useful and professional blog.

Start with a clear layout, an informative homepage, simple navigation, readable typography, and a responsive design. Next, organise your articles, connect related pages, improve loading speed, and add useful calls to action.

Most importantly, design your website around your audience rather than following every new design trend.

Your next step: Review your homepage, navigation menu, and one popular blog post. Identify three areas that need improvement and fix them one by one. Small, thoughtful changes can create a better experience for your readers over time.

Blog website design for beginners, showing a clear homepage layout, simple navigation, readable content, mobile-friendly design, consistent branding, trust-building elements, and website usability tips.

Blog Website Design for Beginners: How to Create a Website Readers Trust

Your blog is more than a collection of articles. It is a place where readers discover your ideas, learn from your experience, and decide whether they want to return. A confusing layout or difficult navigation can make visitors leave before they find the information they need.

Good blog website design helps readers understand your website, explore your content, and take the next step. You do not need an expensive theme or advanced technical skills to create a better experience. A clear layout, readable text, useful navigation, and consistent design can make a meaningful difference.

In this guide, you will learn how to design a beginner-friendly blog website, organize its main pages, improve readability, and build trust with your visitors.

What Is Blog Website Design?

Blog website design is the way your blog looks, feels, and works. It includes your layout, colours, typography, navigation menus, images, buttons, and the way content appears on different devices.

Good design is not only about appearance. It also helps readers find information without confusion.

For example, a visitor should be able to understand what your blog covers, locate relevant articles, and find your contact page without searching through several unrelated menus.

Your design should support your content rather than distract from it. Start with a simple structure and improve it as you learn more about your audience.

Why Does Blog Website Design Matter?

Your website’s design influences how easily people can use it. A clear experience can help readers discover more content and understand your brand.

1. It Makes a Strong First Impression

When someone visits your blog, they quickly look for signs that the website is relevant and trustworthy.

A clear headline, consistent colours, readable text, and organized sections help visitors understand what you offer.

You do not need complicated animations or decorative effects. Focus on presenting your content clearly and professionally.

2. It Helps Readers Find Information

Readers often visit a blog to answer a specific question. If your pages are difficult to navigate, they may leave without finding the right article.

Useful menus, category pages, internal links, and clear headings make your content easier to explore.

3. It Supports Your Website Goals

Your website may need to attract readers, build your personal brand, generate leads, or bring in clients.

Design should support those goals. For example, a freelancer may need a visible portfolio and contact page, while an educational blog may need clear categories and related articles.

Choose your layout based on what visitors need to do, not just what looks attractive.

Step 1: Choose a Clear Website Structure

Before changing colours or fonts, decide how your website should be organized.

Start with a few essential pages:

  • Home: Introduces your website and guides visitors to important content.
  • Blog: Displays your articles and helps readers browse recent posts.
  • About: Explains who you are and what readers can expect.
  • Contact: Gives readers, potential clients, or collaborators a way to reach you.
  • Services or Portfolio: Shows your work and explains how people can work with you, if relevant.

Your exact structure depends on your goals. A personal brand website may need service pages, while a blog focused on education may prioritize topic categories.

Keep the structure simple. Every important page should have a clear purpose.

Step 2: Design a Homepage That Guides Visitors

Your homepage should quickly answer three questions: What is this website about? Who is it for? Where should visitors go next?

Start with a clear headline that explains your main focus. Add a short introduction that tells visitors what they can learn or find on your website.

Next, guide readers to your main content categories. If you publish about blogging, SEO, digital marketing, and online income, these categories can help visitors choose a relevant starting point.

You can also feature selected articles, introduce your expertise, and include a suitable call to action.

Avoid filling the homepage with every article, widget, animation, and promotional message. Too many competing elements can make the page difficult to understand.

For more detailed advice, read how to design a blog homepage that guides visitors.

Step 3: Make Your Blog Easy to Navigate

Navigation helps readers move between pages and discover related content.

Use a simple main menu with clear labels. Words such as “Blog,” “About,” “Services,” and “Contact” are usually easier to understand than creative labels that do not explain their purpose.

Organize articles into meaningful categories. Avoid creating too many categories with only one or two unrelated posts.

You should also use internal links within articles. When a paragraph mentions a related topic, link to a useful article that explains it in more detail.

For example, a post about writing blog content could link to a guide about keyword research or content planning.

A search feature may also help visitors find specific topics, especially as your website grows.

Learn more in website navigation for bloggers.

Step 4: Make Your Content Easy to Read

Even an attractive website can be difficult to use if the text is hard to read.

Choose a clear font and a comfortable text size. Keep enough space between lines and paragraphs. Use a readable text colour against the background.

Break long articles into sections with descriptive headings. Keep paragraphs focused on one main idea, and use bullet points when they make instructions easier to follow.

Avoid using too many font styles, colours, or decorative effects. Consistency helps readers focus on the information.

Your feature images should also support the article. Choose relevant visuals and make sure they do not push the main content too far down the page.

Step 5: Make Your Blog Mobile-Friendly

Many people browse websites on phones and tablets. Your blog should remain easy to use on smaller screens.

A responsive design adjusts the layout to fit different screen sizes. However, a responsive theme alone does not guarantee a good mobile experience.

Check that your text is readable without zooming. Make sure buttons are easy to tap and menus work properly. Avoid layouts that force visitors to scroll sideways.

Review your images as well. Large images can take up too much screen space or slow down the page if they are not optimized.

Open your website on an actual phone when possible. Test the homepage, blog posts, navigation menu, contact forms, and important buttons.

For a detailed walkthrough, read how to make your blog mobile-friendly and easy to read.

Step 6: Use Consistent Colours, Fonts, and Images

A consistent visual style helps readers recognize your brand.

Choose a small colour palette and use it across headings, buttons, links, and other design elements. Make sure text has enough contrast against its background.

Limit your website to a small number of complementary fonts. For example, you might use one font for headings and another for body text, provided both remain easy to read.

Use images that match your topic and brand. Avoid mixing unrelated visual styles across every page.

You do not need to make every page look identical. Instead, create a consistent design system that allows different types of content to feel connected.

Step 7: Improve Website Speed and Usability

A page that takes too long to load can frustrate visitors. Large images, unnecessary plugins, excessive animations, and poorly configured hosting can contribute to performance problems.

Start by compressing images and using appropriate dimensions. Remove plugins you no longer need, and avoid adding features that do not support your goals.

You can use Google PageSpeed Insights to check page performance and identify possible improvements.

Test important functions after making changes. Your menus, buttons, forms, and links should work as expected.

Remember that speed is only one part of usability. Your website should also be clear, accessible, and easy to navigate.

Step 8: Build Trust With Clear Information

Readers are more likely to trust a website when they can understand who created it and how to contact them.

Add an About page that explains your focus and relevant experience. Provide accurate contact information or a working contact form.

If you publish recommendations, disclose relevant commercial relationships where required. Keep claims about your skills, services, and results honest.

Use consistent formatting and review your articles for broken links or outdated information.

Trust is built through the whole experience. A polished design helps, but useful content and transparent communication matter just as much.

Step 9: Use Calls to Action With a Clear Purpose

A call to action tells visitors what they can do next.

Depending on your goals, you might invite readers to explore a related article, subscribe to your newsletter, view your portfolio, or contact you about a service.

Use clear wording that explains the action. For example, “Read the SEO beginner’s guide” tells visitors more than a vague button labelled “Click here.”

Avoid placing too many calls to action on the same page. Choose the most useful next step for the reader.

Make sure every button leads to the correct destination and works on mobile devices.

Step 10: Review and Improve Your Design Regularly

Your website does not need to be perfect on launch day. Review it regularly and improve areas that create problems for visitors.

Start by checking your most important pages. Look for confusing menus, outdated content, broken links, hard-to-read sections, and unclear calls to action.

Ask a few people to use your website and share where they get stuck. Their feedback may reveal problems you have overlooked.

You can also use website analytics to understand which pages attract visitors and which actions people take. Combine that information with direct usability checks rather than assuming that one metric explains everything.

Make one change at a time when possible. This helps you understand whether the change actually improves the experience.

Common Blog Website Design Mistakes to Avoid

Keep these common mistakes in mind as you improve your site:

  • Too many menu items: Visitors may struggle to find important pages.
  • Cluttered layouts: Too many banners and widgets compete with the main content.
  • Small or low-contrast text: Readers may find articles difficult to read.
  • Ignoring mobile users: Menus, buttons, and layouts may work poorly on phones.
  • Unnecessary animations: Decorative effects can distract visitors and affect performance.
  • Unclear calls to action: Visitors may not know what to do next.
  • Outdated information: Old links and inaccurate details can reduce trust.

You can fix these issues gradually. Focus first on problems that prevent readers from finding or understanding your content.

Good blog website design helps visitors understand your website, find useful information, and feel confident exploring your content.

Start with a clear structure, a helpful homepage, simple navigation, readable text, and a mobile-friendly layout. Then improve performance, build trust, and guide visitors toward relevant next steps.

You do not need to redesign everything at once. Make small, practical improvements and review how they affect the reader experience.

The goal is simple: create a website that looks professional, works smoothly, and makes it easy for people to find the content they came for.

AI tools for bloggers to simplify content creation, including AI writing and brainstorming, editing and proofreading, image design, research, SEO optimization, and content planning workflows.

AI Tools for Bloggers: A Complete Guide to Smarter Content Creation

Creating a successful blog takes more than writing a few articles. You need to find useful topics, research your audience, plan content, improve readability, and make every post easy to discover. These tasks can take hours, especially when you manage a blog on your own.

This is where AI tools for bloggers can help. They can support brainstorming, research, outlining, editing, and content planning. As a result, you can spend less time on repetitive tasks and more time creating useful content for your readers.

However, AI is not a replacement for your knowledge, experience, or judgment. The best results come when you combine AI assistance with human creativity and careful fact-checking.

In this guide, you will learn how AI tools work, which blogging tasks they can support, how to use them in your workflow, and what to avoid when creating content with AI.

What Are AI Tools for Bloggers?

AI tools for bloggers are software applications that use artificial intelligence to assist with content creation and website tasks.

Depending on the tool, you may be able to generate topic ideas, organize research, create article outlines, improve grammar, design images, or summarize information.

For example, a conversational AI assistant can help you brainstorm blog topics. A writing assistant can suggest clearer sentences. An image design tool can help you create a feature image for your article.

These tools serve different purposes. Therefore, you do not need to use every available tool. Start with the tasks that take the most time in your blogging routine.

Why Should Bloggers Use AI Tools?

AI can make parts of the blogging process easier, especially for beginners and solo creators.

1. Generate Blog Ideas Faster

Finding fresh topics can be difficult when you publish regularly. AI can suggest article ideas based on your niche, audience, and existing content.

For example, if your blog covers SEO, you could ask for beginner-friendly topics about keyword research, internal linking, or website traffic.

Next, review the suggestions and choose topics that match your readers’ needs. Check search demand and competition before committing to a topic.

2. Save Time on Content Planning

Planning helps you publish consistently without deciding what to write every day.

AI can organize ideas into topic groups, suggest a publishing calendar, and help you create outlines. It can also help identify related articles that belong in a content cluster.

For a practical planning process, read how to create a content strategy for your blog.

3. Improve Writing and Readability

Writing assistants can help you spot grammar mistakes, simplify complex sentences, and improve the flow of your article.

This is useful when you want your content to be easy for beginners to understand.

However, do not accept every suggested change. Review each edit to make sure it preserves your meaning, tone, and intended message.

4. Support Research and Organization

AI can help you create research questions, organize notes, and identify areas that need further investigation.

Still, AI-generated answers can contain mistakes or outdated information. Verify important facts using reliable sources before publishing.

For statistics, product details, legal requirements, health information, and current events, use trustworthy original sources whenever possible.

Best Types of AI Tools for Bloggers

You do not need a large collection of tools to run a blog. Choose tools based on your workflow and budget.

1. AI Writing and Brainstorming Tools

These tools help you generate ideas, create outlines, explore different angles, and refine drafts.

For example, ChatGPT can help you brainstorm article ideas, organize your thinking, and turn a rough topic into a structured outline.

Use it to create a first draft or explore alternatives, then add your own examples, experience, and insights.

2. AI Editing and Proofreading Tools

Writing assistants can identify grammar issues, suggest clearer wording, and help maintain a consistent tone.

Grammarly offers writing assistance that can help you review and refine your content.

Before using any suggestion, check whether it makes your writing clearer. A sentence does not need to sound formal or complicated to be effective.

3. AI Image and Design Tools

Visuals help readers understand content and make blog pages more appealing.

Design tools with AI features can assist with creating feature images, social media graphics, and visual layouts. For example, Canva offers design tools that can support your content workflow.

Choose visuals that match the article. Avoid images that are decorative but unrelated to the topic. Also, check the tool’s licensing terms before using generated or stock assets commercially.

4. AI Research and Productivity Tools

Some AI tools can summarize supplied documents, organize notes, or help you compare information from different sources.

These features can reduce manual work. However, a summary is not a substitute for checking the original source, especially when accuracy matters.

Before publishing, confirm important claims and add links to sources that support your article.

How to Use AI Tools in Your Blogging Workflow

You can use AI at different stages of content creation. A simple process helps you work efficiently without losing control of the final article.

Step 1: Choose a Topic for Your Audience

Start with your readers’ problems, questions, and goals. Use AI to explore possible topics, but do not choose an idea simply because it sounds interesting.

Ask yourself whether the topic fits your niche and offers something useful to your audience.

Step 2: Research Keywords and Search Intent

Once you select a topic, identify the main search term and related questions.

AI can help you brainstorm possible keywords and understand different search intents. However, validate your keyword choices with keyword research tools and search results.

For more guidance, read how to conduct keyword research for your blog.

Step 3: Create an Article Outline

Ask AI to organize your topic into a logical outline. Include an introduction, clear H2 headings, useful examples, and a conclusion.

Review the outline before drafting. Remove repetitive sections and add any important points that AI missed.

Your outline should answer the reader’s main question without adding unnecessary sections.

Step 4: Draft and Improve the Article

You can use AI to create a rough draft, explain difficult concepts, or improve individual paragraphs.

Then revise the content in your own voice. Add practical steps, original examples, relevant experience, and useful details that make the article more valuable.

Do not publish a draft without reviewing it. Check every important claim and remove generic statements that do not help the reader.

Step 5: Optimize the Article for SEO

AI can help you check whether your headings are clear, whether the article covers important subtopics, and whether the introduction answers the reader’s question.

You should still review the SEO title, URL slug, meta description, internal links, image alt text, and readability yourself.

For more guidance, explore SEO for beginners.

Remember that using AI does not automatically improve rankings. Helpful content, accuracy, originality, and a good reader experience remain essential.

Step 6: Fact-Check and Publish

Before publishing, verify names, dates, statistics, quotations, and technical instructions. Check external links and make sure your images are relevant.

Read the article from the reader’s perspective. Does it answer the question clearly? Does it offer practical value? Is anything repetitive or misleading?

Once the article passes these checks, publish it and review its performance over time.

How to Write Better Prompts for Blogging

The quality of AI output often depends on the instructions you provide.

A vague prompt such as “Write a blog about SEO” gives little direction. A specific prompt explains the audience, goal, tone, and expected result.

Try this example:

“Create a beginner-friendly outline for a blog post about internal linking. Use simple English, clear H2 headings, practical examples, and a logical order. Avoid repeated points and include questions a beginner may have.”

You can improve the result by adding your target audience, preferred article length, primary keyword, and content requirements.

However, treat the result as a starting point. Review it and add the information your audience needs.

Common Mistakes to Avoid When Using AI

AI can save time, but careless use can reduce the quality of your blog.

  • Publishing without editing: Drafts may contain repeated ideas, vague explanations, or errors.
  • Trusting every answer: AI tools can produce inaccurate or outdated information.
  • Creating content only for search engines: Articles should solve readers’ problems, not simply repeat keywords.
  • Ignoring your own voice: Readers should recognize your style, experience, and point of view.
  • Using too many tools: Managing several overlapping tools can waste time and money.
  • Ignoring copyright and privacy: Check image licences and avoid sharing confidential information with tools unless their terms and your permissions allow it.

Google’s guidance on generative AI content emphasizes accuracy, quality, and relevance. Using AI is not automatically a problem, but creating large amounts of low-value content to manipulate search rankings can violate Google’s spam policies.

Focus on making each article useful and original.

How to Choose the Right AI Tools for Your Blog

Before paying for a tool, consider what you actually need.

First, identify your biggest challenge. You may struggle with writing, research, visual design, or content planning.

Next, compare the tool’s features, pricing, usage limits, privacy terms, and ease of use. Test the free version if one is available.

Finally, keep only the tools that improve your workflow. A simple combination of an AI assistant, an editing tool, and a design tool may be enough for many beginners.

Review your process regularly. If a tool does not save time or improve quality, you may not need it.

AI tools for bloggers can make brainstorming, research, writing, editing, and content planning easier. They are especially useful when you need a starting point or want to reduce repetitive work.

The key is to use AI as an assistant, not as a replacement for your judgment. Choose relevant topics, verify information, add original insights, and edit every article before publishing.

Start with one or two tools that solve a real problem in your workflow. As you gain experience, build a process that helps you create useful, trustworthy content consistently.

Your goal is not to publish more articles at any cost. It is to help readers find clear answers and valuable information.

Google Analytics for beginners guide showing how to track website traffic, users, sessions, engagement, popular pages, traffic sources, and key events using Google Analytics 4 (GA4).

Google Analytics for Beginners: How to Track Website Traffic and User Behavior

Running a website without tracking its performance is like running a business without checking how it is doing. You may publish useful articles, improve your website, and share content on social media, but you still need to know what is working.

Google Analytics for beginners provides a starting point for understanding website traffic and visitor behavior. It helps you learn how people find your website, which pages they visit, and how they interact with your content.

For bloggers, freelancers, and small business owners, this information can guide better decisions. Instead of guessing which topics attract readers, you can use data to identify useful opportunities.

In this guide, you will learn what Google Analytics is, how it works, which reports matter, and how to use the information to improve your website.

What Is Google Analytics?

Google Analytics is a free web analytics platform that helps website owners measure traffic and user interactions. Its current standard version, Google Analytics 4 (GA4), uses an event-based measurement model.

In simple terms, it records activities on your website, such as page views, clicks on certain tracked elements, and other interactions when the relevant measurement is configured.

For example, if you publish a blog post about SEO, Google Analytics can help you understand how many users visited the page and whether they continued exploring your website.

You can also examine engagement and track specific actions, such as form submissions or purchases, when those events are configured correctly.

Google Analytics does not automatically explain every reason behind a visitor’s behavior. However, it provides useful information to help you investigate what is happening.

Why Is Google Analytics Important for Your Website?

Google Analytics can help you make informed decisions instead of relying only on assumptions.

Here are some important benefits.

1. Understand Where Your Visitors Come From

Visitors may reach your website through organic search, social media, referral links, email campaigns, or direct visits.

Understanding these channels helps you identify which sources bring people to your website.

For example, you may discover that search engines bring visitors to your educational articles, while social media attracts people to your portfolio. This information can help you plan your future content and promotion.

2. Identify Your Most Popular Pages

Some pages attract more visitors than others. Google Analytics can help you identify which articles, landing pages, and other content receive attention.

You can use these insights to find topics worth expanding, add relevant internal links, and improve pages that support your website goals.

However, a page with more traffic is not always more valuable. A smaller page that generates enquiries or subscriptions may contribute more to your goals.

3. Understand Visitor Engagement

Traffic numbers alone do not tell the whole story. You also need to understand whether visitors interact with your content.

GA4 provides engagement-related measurements and reports that can help you investigate visitor activity.

For example, if a blog post receives visitors but generates little further interaction, you might review its introduction, readability, page layout, and links to related content.

4. Measure Important Actions

If your website aims to generate enquiries, subscriptions, downloads, or sales, you can configure events to measure these actions.

Once the relevant events and reporting are set up correctly, you can see whether your website supports your business goals.

This makes it easier to evaluate more than just page views.

How Does Google Analytics Work?

Google Analytics generally collects website interaction data through a measurement tag or an appropriate integration.

After you create a GA4 property and install its measurement code, the platform can collect configured events when visitors use your website. The data then appears in reports, although processing times can vary.

The basic process looks like this:

  1. Create a Google Analytics account.
  2. Set up a GA4 property for your website.
  3. Add the measurement tag or use a supported integration.
  4. Test that data is being collected.
  5. Review reports to understand website activity.

The exact setup depends on your website platform and configuration.

Remember that data collection must follow applicable privacy requirements. Configure consent and tracking appropriately for your visitors and location.

For detailed instructions, visit the official Google Analytics documentation.

Important Google Analytics Metrics for Beginners

Google Analytics contains many reports and measurements. You do not need to learn everything at once. Start with the metrics that answer your most important questions.

1. Users

Users represent people or user identities measured by Google Analytics according to its reporting definitions and settings.

This metric helps you understand how many users interacted with your website during a selected period.

Keep in mind that analytics measurements do not always equal the exact number of individual people. Devices, browsers, consent settings, and measurement limitations can affect the results.

2. Sessions

A session represents a group of interactions that take place during a visit to your website, according to GA4’s session rules.

Sessions help you understand how often visits occur.

For example, one person may visit your website on Monday and return on Thursday. These visits can contribute to separate sessions.

3. Views

Views measure page or screen views recorded by Google Analytics. This metric helps you understand how frequently visitors view your content.

Compare views across relevant pages to identify popular topics and pages that may need improvement.

4. Engagement Rate

Engagement rate measures the percentage of sessions that qualify as engaged sessions under GA4’s rules.

It can help you investigate whether visitors are interacting with your website in meaningful ways.

Do not judge a page using this metric alone. A visitor may find a quick answer and leave satisfied, while another page may require more interaction before a visitor completes a task.

5. Conversions and Key Events

GA4 lets you identify important events as key events for reporting purposes. Depending on your configuration, these may include newsletter signups, lead submissions, or purchases.

Tracking these actions helps you understand whether visitors are completing meaningful tasks.

Choose events that match your actual website goals instead of tracking every possible interaction without a clear purpose.

How to Read Google Analytics Reports

When you open Google Analytics, begin with a specific question. This makes it easier to choose the right report.

Traffic Acquisition Report

The Traffic acquisition report helps you understand how sessions arrive through different traffic sources and channels.

You can use it to investigate whether visitors come from organic search, social media, referral links, email, or other channels.

For example, if organic search contributes a growing share of sessions, you can examine which landing pages and topics are associated with that growth.

Pages and Screens Report

The Pages and screens report helps you examine which pages receive views and how users interact with your content.

Use it to identify popular articles, pages that deserve updates, and content that could link readers to related resources.

You can also compare performance over time rather than relying on a single day’s results.

Engagement Reports

Engagement reports help you explore activity such as views, events, and other engagement measurements available in your property.

Review these reports to understand which pages attract attention and which actions visitors take.

Realtime Report

The Realtime report shows recent activity as it is recorded by your property. It can be especially helpful when testing a new setup or checking whether a recent interaction is being collected.

However, realtime activity is not a substitute for longer-term reporting. Use reports covering suitable date ranges to understand broader trends.

How to Use Google Analytics to Improve Your Website

Collecting data is only the first step. The real value comes from using it to make improvements.

Step 1: Choose a Clear Website Goal

Decide what you want your website to achieve.

Your goal might be to attract organic visitors, increase newsletter subscriptions, generate freelance enquiries, or encourage readers to explore more articles.

A clear goal helps you decide which measurements matter.

Step 2: Review Your Traffic Sources

Examine the channels bringing visitors to your website.

If organic search is important, combine analytics data with Google Search Console to investigate search impressions, clicks, and search queries.

If social media is a major source, review which campaigns or links bring visitors who engage with your content.

Remember that different tools measure different parts of the visitor journey. Their numbers may not match exactly.

Step 3: Identify Pages Worth Improving

Look for pages that attract traffic but do not appear to support your goal.

For example, a popular article might receive many views but provide few clear paths to related content. Adding relevant internal links and a useful next step may improve the visitor experience.

You can also update outdated information, improve readability, and make important resources easier to find.

Step 4: Track Important Actions

Configure relevant events for actions such as contact form submissions, newsletter signups, or purchases.

Test the setup to make sure the events are recorded correctly. Avoid treating an event as a successful conversion until you have verified what it measures.

Step 5: Compare Results Over Time

Website performance changes with seasonality, publishing activity, campaigns, and search demand.

Compare suitable periods and look for patterns rather than reacting to every daily fluctuation.

When you make a change, record what you changed and review its results after enough data has accumulated.

Common Google Analytics Mistakes to Avoid

Beginners can make several mistakes when interpreting analytics data.

  • Focusing only on traffic: More visitors do not automatically mean more subscribers, enquiries, or sales.
  • Ignoring tracking setup: Incorrect tags or events can lead to incomplete or misleading reports.
  • Comparing different periods carelessly: Seasonality and campaign timing can affect results.
  • Making decisions from small data samples: Limited data may not reveal a reliable pattern.
  • Ignoring privacy requirements: Tracking must be configured responsibly and in line with applicable rules.
  • Treating every metric as equally important: Focus on measurements that support your website goals.

Use analytics as a guide for investigation, not as a replacement for understanding your audience.

Google Analytics for beginners does not have to feel complicated. Start by understanding users, sessions, views, engagement, and the traffic sources bringing visitors to your website.

Next, learn to read the reports that match your goals. Use the information to improve your content, strengthen your website structure, and measure meaningful actions.

Most importantly, review your results regularly and make changes based on evidence. With consistent practice, Google Analytics can help you understand your audience and make better decisions about your website’s growth.